【pytorch】Animatable 3D Gaussian+源码解读(一)_animatable gaussians-程序员宅基地
概述
创新点:
- 多人场景 无遮挡处理
- 以3DGS进行表达
方法:
环境配置
基本和3DGS的配置差不多…
pip install torch==1.13.1+cu117 torchvision --index-url https://download.pytorch.org/whl/cu117
pip install hydra-core==1.3.2
pip install pytorch-lightning==2.1.2
pip install imageio
pip install ./submodules/diff-gaussian-rasterization
pip install ./submodules/simple-knn
pip install git+https://github.com/NVlabs/tiny-cuda-nn/#subdirectory=bindings/torch
子模块记得 git clone --recursive 多次踩坑…
tinycudann建议先git到本地…
数据准备
|---data
|   |---Gala
|   |---PeopleSnapshot
|   |---smpl
下载以后挨个解压,整理成格式
单个数据集结构:
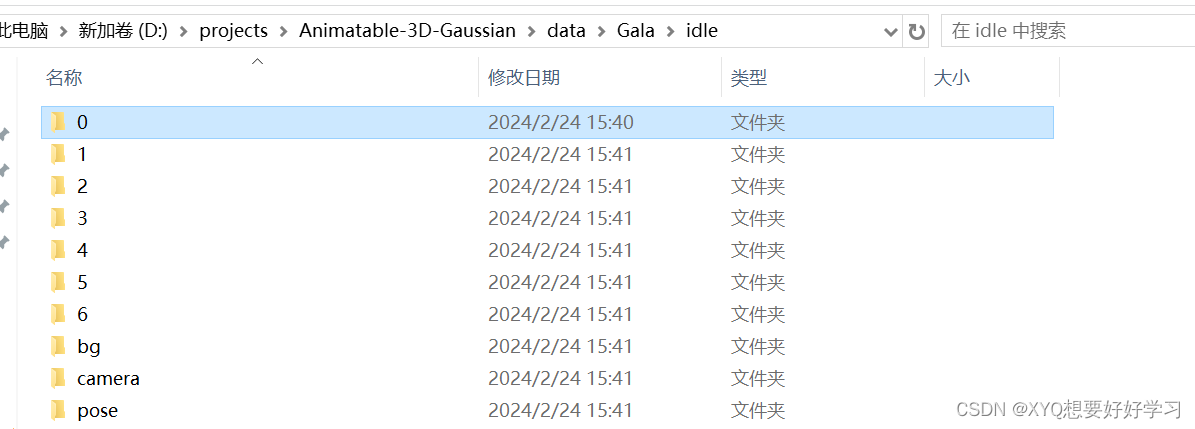
0-6代表不同相机序号——同一视频的不同视角
每个文件夹均有对应的300帧+300mask。

bg定义了7个相机视角下的背景,目前还不知道有什么用,后续看看…

camera文件夹下是7个文本文件,描述相机参数。具体的表示在【pytorch】Animatable 3D Gaussian+源码解读(二)中分析。
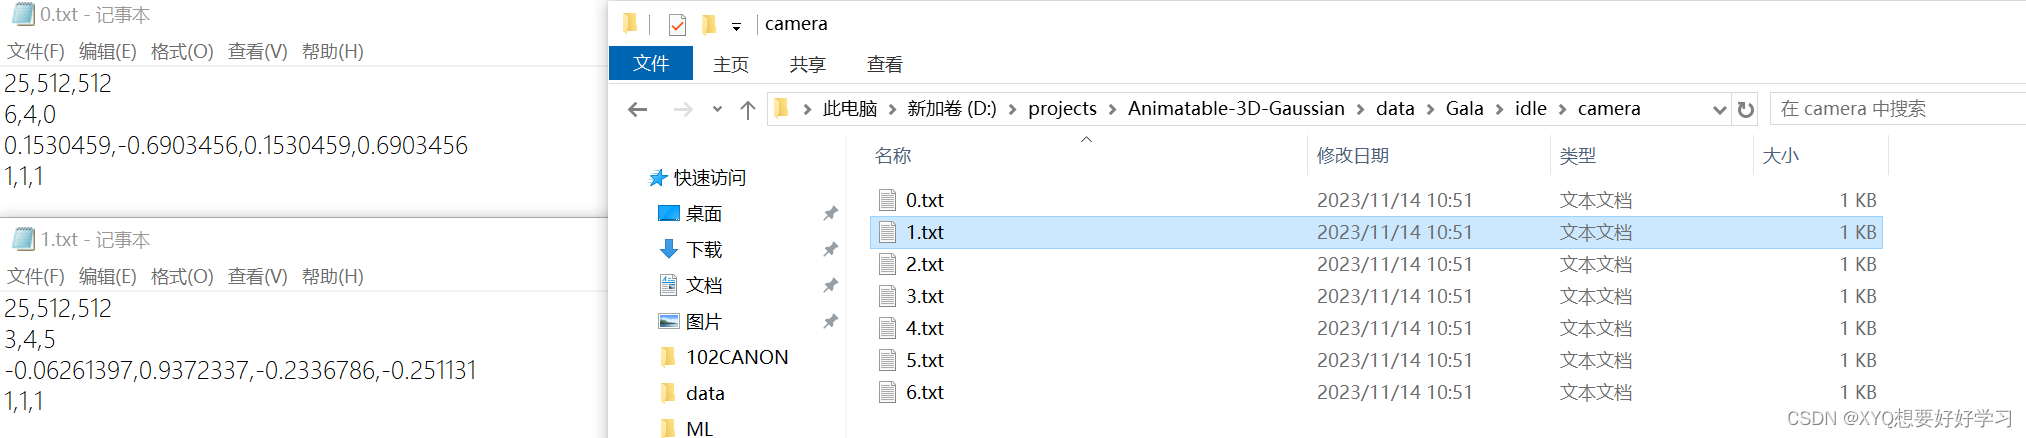
pose文件夹下是300个文本文件,分别描述300帧中300个pose。
此外,Gala数据集中还有一个名为model的文件夹需要注意:
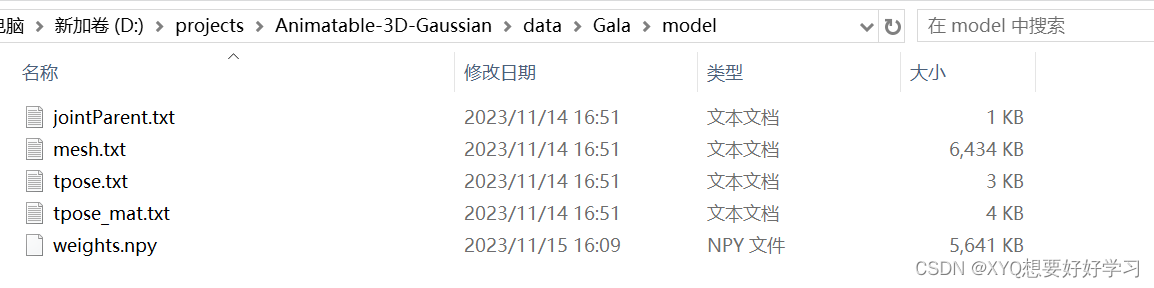
应该是定义了人体标准模板,包括网格、tpose、蒙皮权重等…
model_path (str) : The path to the folder that holds the vertices, tpose matrix, binding weights and indexes.
数据集具体是怎么利用的我们再结合代码来看看…
代码解读
先跟着debug走一遍流程… 然后再以面向对象的思路把握全局
Define Gaussian
首先定义场景表达元素:高斯球
train.py:
model = NeRFModel(opt)
nerf_model.py:
class NeRFModel(pl.LightningModule):
    def __init__(self, opt):
        super(NeRFModel, self).__init__()
        self.save_hyperparameters() # 储存init中输入的所有超参
        self.model = hydra.utils.instantiate(opt.deformer)
此处,opt.deformer==Gala模型:
Since the public dataset [1] contains few pose and shadow changes, we create a new dataset named GalaBasketball in order to show the
performance of our method under complex motion and dynamic
shadows.
正文开始:
    """
    Attributes:
        parents (list[J]) : Indicate the parent joint for each joint, -1 for root joint.
        bone_count (int) : The count of joints including root joint, i.e. J.
        joints (torch.Tensor[J-1, 3]) : The translations of each joint relative to the parent joint, except for root joint.
        tpose_w2l_mats (torch.Tensor[J, 3]) : The skeleton to local transform matrixes for each joint.
    """
初始化函数:
        """
        Init joints and offset matrixes from files.

        Args:
            model_path (str) : The path to the folder that holds the vertices, tpose matrix, binding weights and indexes.
            num_players (int) : Number of players.  # 多人场景
        """
由此模型超参数为:
首先是一些人体基本操作——读取相关数据:
        model_file = os.path.join(model_path, "mesh.txt")
        vertices, normals, uvs, bone_weights, bone_indices = read_skinned_mesh_data(
            model_file)

        tpose_file = os.path.join(model_path, "tpose.txt")
        tpose_positions, tpose_rotations, tpose_scales = read_bone_joints(
            tpose_file)

        tpose_mat_file = os.path.join(model_path, "tpose_mat.txt")
        tpose_w2l_mats = read_bone_joint_mats(tpose_mat_file)

        joint_parent_file = os.path.join(model_path, "jointParent.txt")
        self.joint_parent_idx = read_bone_parent_indices(joint_parent_file)

        self.bone_count = tpose_positions.shape[0]
        self.vertex_count = vertices.shape[0]

        print("mesh loaded:")
        print("total vertices: " + str(vertices.shape[0]))
        print("num of joints: " + str(self.bone_count))
read_skinned_mesh_data(“mesh.txt”)函数读取顶点、蒙皮权重、UV坐标;
read_bone_joints(“tpose.txt”)函数读取关节数据;
read_bone_joint_mats(“tpose_mat.txt”)读取world-to-local转化矩阵;
read_bone_parent_indices(“jointParent.txt”)读取关节父子关系。
多人扩维模板复制:
        self.register_buffer('v_template', vertices[None, ...].repeat(
            [self.num_players, 1, 1]))
        uvs = uvs * 2. - 1.
        self.register_buffer('uvs', uvs[None, ...].repeat(
            [self.num_players, 1, 1]))
        bone_weights = torch.Tensor(
            np.load(os.path.join(model_path, "weights.npy")))[None, ...].repeat([self.num_players, 1, 1])
        self.register_buffer("bone_weights", bone_weights)
1.register_buffer:定义一组参数,该组参数的特别之处在于:模型训练时不会更新(即调用 optimizer.step() 后该组参数不会变化,只可人为地改变它们的值),但是保存模型时,该组参数又作为模型参数不可或缺的一部分被保存。
2.[None,…]:多一维
		# 关节位置申请加入训练
        self.J = nn.Parameter(
            tpose_positions[None, ...].repeat([self.num_players, 1, 1]))
        self.tpose_w2l_mats = tpose_w2l_mats

        # 顶点归一化
        minmax = [self.v_template[0].min(
            dim=0).values * 1.05,  self.v_template[0].max(dim=0).values * 1.05]
        self.register_buffer('normalized_vertices',
                             (self.v_template - minmax[0]) / (minmax[1] - minmax[0]))

        # distCUDA2 from simple_knn 计算点云中的每个点到与其最近的K个点的平均距离的平方
        dist2 = torch.clamp_min(
            distCUDA2(vertices.float().cuda()), 0.0000001)[..., None].repeat([1, 3])
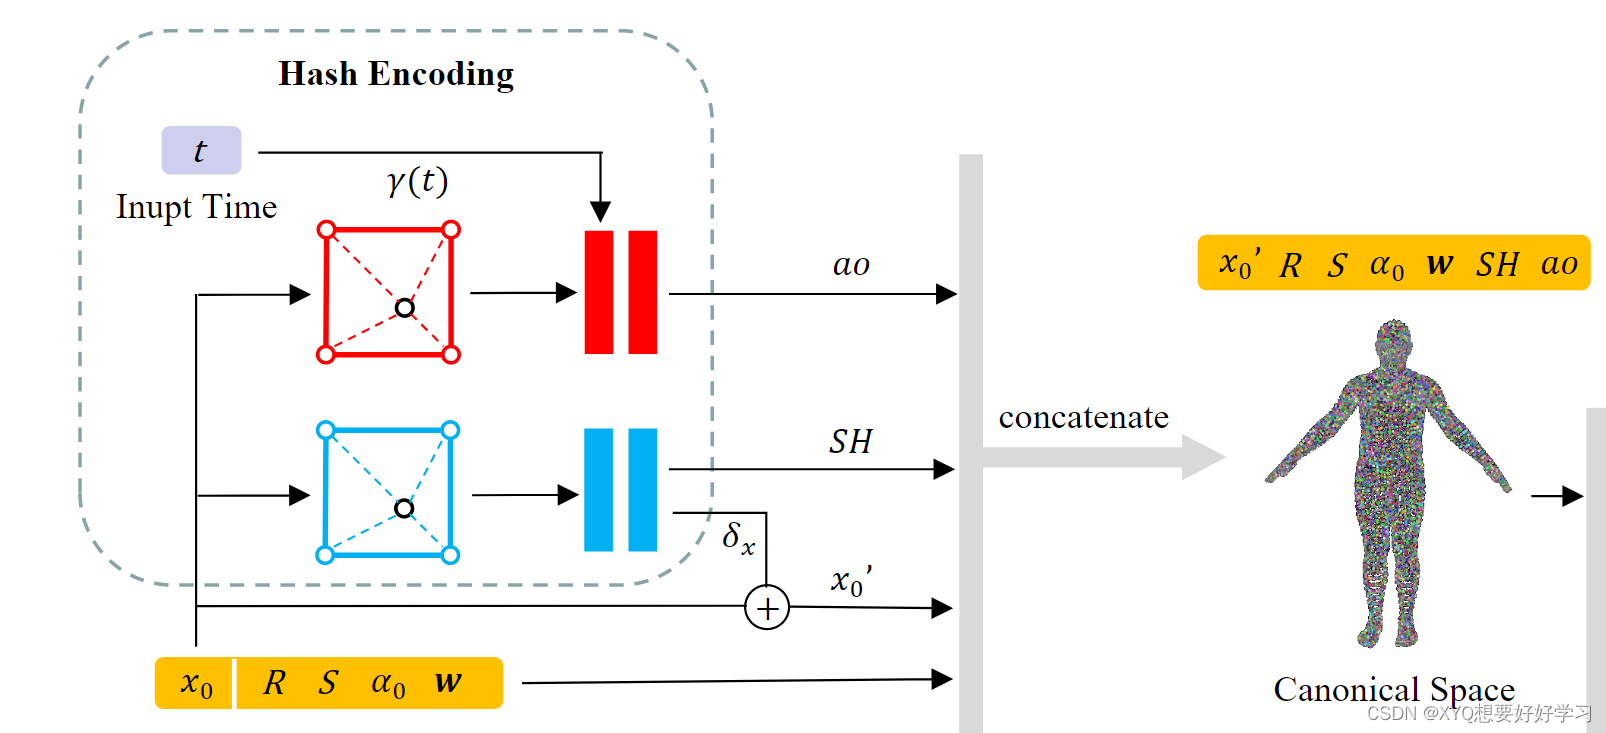
然后开始处理要训练的高斯:
定义顶点偏移:
using unconstrained per-vertex displacement can easily cause the optimization process to diverge in dynamic scenes.Therefore, we also model a parameter field for vertex displacement. F.
	# x0 →  δx
    if use_point_displacement:
        self.displacements = nn.Parameter(
            torch.zeros_like(self.v_template))
    else:
        # 使用encoder
        self.displacementEncoder = DisplacementEncoder(
            encoder=encoder_type, num_players=num_players)
多种编码方式:uv encoder、hash encoder…
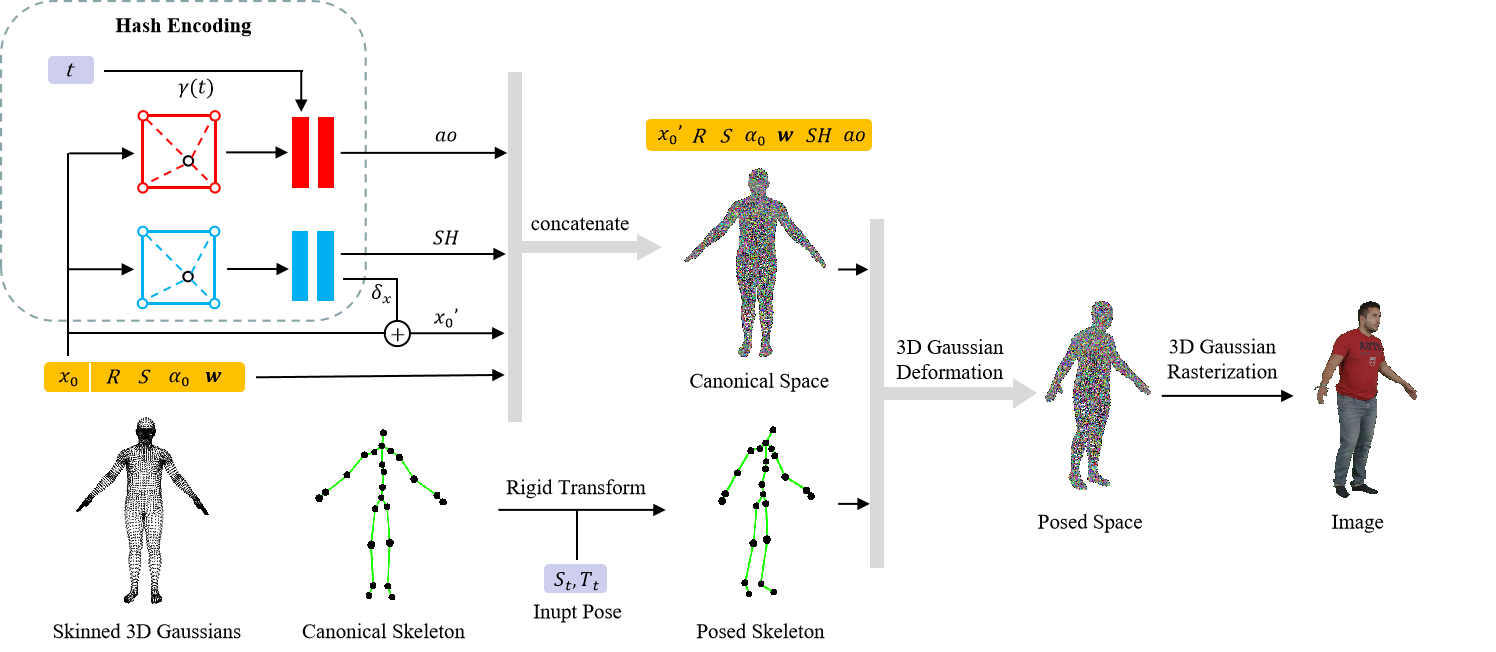
Since our animatable 3D Gaussian representation is initialized by a standard human body model, the centers of 3D Gaussians are uniformly distributed near the human surface. We only need to sample at fixed positions near the surface of the human body in the parameter fields. This allows for significant compression of the hash table for the hash encoding [36]. Thus, we choose the hash encoding to model our parameter field to reduce the time and storage consumption.
class DisplacementEncoder(nn.Module):
    def __init__(self, encoder="uv", num_players=1):
        super().__init__()
        self.num_players = num_players
        if encoder == "uv":
            self.input_channels = 2
            self.encoder = UVEncoder(
                3, num_players=num_players)
        elif encoder == "hash":
            self.input_channels = 3
            self.encoder = HashEncoder(
                3, num_players=num_players)
        elif encoder == "triplane":
            self.input_channels = 3
            self.encoder = TriPlaneEncoder(
                3, num_players=num_players)
        else:
            raise Exception("encoder does not exist!")
这里先选择hash编码,使用tcnn
class HashEncoder(nn.Module):
    def __init__(self, num_channels, num_players=1):
        super().__init__()
        self.networks = []
        self.num_players = num_players
        for i in range(num_players):
            self.networks.append(tcnn.NetworkWithInputEncoding(
                n_input_dims=3,
                n_output_dims=num_channels,
                encoding_config={
                    "otype": "HashGrid",
                    "n_levels": 16,
                    "n_features_per_level": 4,
                    "log2_hashmap_size": 17,
                    "base_resolution": 4,
                    "per_level_scale": 1.5,
                },
                network_config={
                    "otype": "FullyFusedMLP",
                    "activation": "ReLU",
                    "output_activation": "None",
                    "n_neurons": 64,
                    "n_hidden_layers": 2,
                }
            ))
        self.networks = nn.ModuleList(self.networks)
定义颜色、透明度、缩放、旋转:
rendering based on 3D Gaussian rasterization can only backpropagate the gradient to a finite number of Gaussians in a single iteration, which leads to a slow or even divergent optimization process for dynamic scenes. To address this issue, we suggest sampling spherical harmonic coefficients SH for each vertex from a continuous parameter field, which is able to affect all neighboring Gaussians in a single optimization.
Optionally, we provide UV-encoded spherical harmonic coefficients, allowing fast processing of custom human models with UV coordinate mappings. UV encoding potentially achieves higher reconstruction quality compared to hash encoding.
        n = self.v_template.shape[1] * num_players # 总顶点数
        # x0 → SH
        if use_point_color:
            self.shs_dc = nn.Parameter(torch.zeros(
                [n, 1, 3]))
            self.shs_rest = nn.Parameter(torch.zeros(
                [n, (max_sh_degree + 1) ** 2 - 1, 3]))
        else:
        	# 使用encoder
            self.shEncoder = SHEncoder(max_sh_degree=max_sh_degree,
                                       encoder=encoder_type, num_players=num_players)
        self.opacity = nn.Parameter(inverse_sigmoid(
            0.2 * torch.ones((n, 1), dtype=torch.float)))
        self.scales = nn.Parameter(
            torch.log(torch.sqrt(dist2)).repeat([num_players, 1]))
        rotations = torch.zeros([n, 4])
        rotations[:, 0] = 1
        self.rotations = nn.Parameter(rotations)
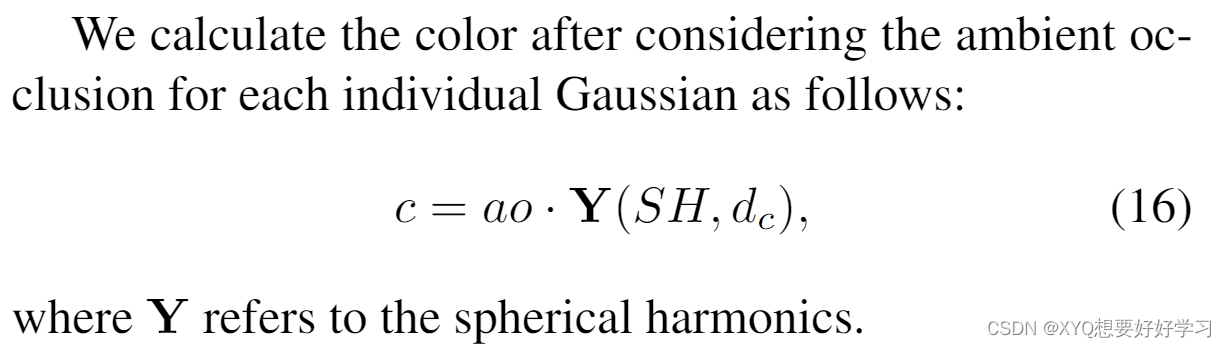
遮挡处理:x0, γ(t) → ao
We propose a time-dependent ambient occlusion module to address the issue of dynamic shadows in specific scenes.
        if enable_ambient_occlusion:
            self.aoEncoder = AOEncoder(
                encoder=encoder_type, max_freq=max_freq, num_players=num_players)
        self.register_buffer("aos", torch.ones_like(self.opacity))
we also employ hash encoding for the ambient occlusion ao, since shadows should be continuously modeled in space
class AOEncoder(nn.Module):
    def __init__(self, encoder="uv", num_players=1, max_freq=4):
        super().__init__()
        self.num_players = num_players
        self.max_freq = max_freq
        if encoder == "uv":
            self.input_channels = 2
            self.encoder = UVTimeEncoder(
                1, num_players=num_players, time_dim=max_freq*2 + 1)
        elif encoder == "hash":
            self.input_channels = 3
            self.encoder = HashTimeEncoder(
                1, num_players=num_players, time_dim=max_freq*2 + 1)
        else:
            raise Exception("encoder does not exist!")
class HashTimeEncoder(nn.Module):
    def __init__(self, num_channels, time_dim=9, num_players=1):
        super().__init__()
        self.networks = []
        self.time_nets = []
        self.num_players = num_players
        for i in range(num_players):
            self.networks.append(tcnn.Encoding(
                n_input_dims=3,
                encoding_config={
                    "otype": "HashGrid",
                    "n_levels": 16,
                    "n_features_per_level": 4,
                    "log2_hashmap_size": 19,
                    "base_resolution": 4,
                    "per_level_scale": 1.5,
                },
            ))
            self.time_nets.append(tcnn.Network(
                n_input_dims=self.networks[i].n_output_dims + time_dim,
                n_output_dims=num_channels,
                network_config={
                    "otype": "FullyFusedMLP",
                    "activation": "ReLU",
                    "output_activation": "None",
                    "n_neurons": 64,
                    "n_hidden_layers": 2,
                }
            ))
        self.networks = nn.ModuleList(self.networks)
        self.time_nets = nn.ModuleList(self.time_nets)
至此,高斯球定义完成。

【pytorch】Animatable 3D Gaussian+源码解读(二)将进一步介绍数据集的处理细节。
智能推荐
while循环&CPU占用率高问题深入分析与解决方案_main函数使用while(1)循环cpu占用99-程序员宅基地
文章浏览阅读3.8k次,点赞9次,收藏28次。直接上一个工作中碰到的问题,另外一个系统开启多线程调用我这边的接口,然后我这边会开启多线程批量查询第三方接口并且返回给调用方。使用的是两三年前别人遗留下来的方法,放到线上后发现确实是可以正常取到结果,但是一旦调用,CPU占用就直接100%(部署环境是win server服务器)。因此查看了下相关的老代码并使用JProfiler查看发现是在某个while循环的时候有问题。具体项目代码就不贴了,类似于下面这段代码。while(flag) {//your code;}这里的flag._main函数使用while(1)循环cpu占用99
【无标题】jetbrains idea shift f6不生效_idea shift +f6快捷键不生效-程序员宅基地
文章浏览阅读347次。idea shift f6 快捷键无效_idea shift +f6快捷键不生效
node.js学习笔记之Node中的核心模块_node模块中有很多核心模块,以下不属于核心模块,使用时需下载的是-程序员宅基地
文章浏览阅读135次。Ecmacript 中没有DOM 和 BOM核心模块Node为JavaScript提供了很多服务器级别,这些API绝大多数都被包装到了一个具名和核心模块中了,例如文件操作的 fs 核心模块 ,http服务构建的http 模块 path 路径操作模块 os 操作系统信息模块// 用来获取机器信息的var os = require('os')// 用来操作路径的var path = require('path')// 获取当前机器的 CPU 信息console.log(os.cpus._node模块中有很多核心模块,以下不属于核心模块,使用时需下载的是
数学建模【SPSS 下载-安装、方差分析与回归分析的SPSS实现(软件概述、方差分析、回归分析)】_化工数学模型数据回归软件-程序员宅基地
文章浏览阅读10w+次,点赞435次,收藏3.4k次。SPSS 22 下载安装过程7.6 方差分析与回归分析的SPSS实现7.6.1 SPSS软件概述1 SPSS版本与安装2 SPSS界面3 SPSS特点4 SPSS数据7.6.2 SPSS与方差分析1 单因素方差分析2 双因素方差分析7.6.3 SPSS与回归分析SPSS回归分析过程牙膏价格问题的回归分析_化工数学模型数据回归软件
利用hutool实现邮件发送功能_hutool发送邮件-程序员宅基地
文章浏览阅读7.5k次。如何利用hutool工具包实现邮件发送功能呢?1、首先引入hutool依赖<dependency> <groupId>cn.hutool</groupId> <artifactId>hutool-all</artifactId> <version>5.7.19</version></dependency>2、编写邮件发送工具类package com.pc.c..._hutool发送邮件
docker安装elasticsearch,elasticsearch-head,kibana,ik分词器_docker安装kibana连接elasticsearch并且elasticsearch有密码-程序员宅基地
文章浏览阅读867次,点赞2次,收藏2次。docker安装elasticsearch,elasticsearch-head,kibana,ik分词器安装方式基本有两种,一种是pull的方式,一种是Dockerfile的方式,由于pull的方式pull下来后还需配置许多东西且不便于复用,个人比较喜欢使用Dockerfile的方式所有docker支持的镜像基本都在https://hub.docker.com/docker的官网上能找到合..._docker安装kibana连接elasticsearch并且elasticsearch有密码
随便推点
Python 攻克移动开发失败!_beeware-程序员宅基地
文章浏览阅读1.3w次,点赞57次,收藏92次。整理 | 郑丽媛出品 | CSDN(ID:CSDNnews)近年来,随着机器学习的兴起,有一门编程语言逐渐变得火热——Python。得益于其针对机器学习提供了大量开源框架和第三方模块,内置..._beeware
Swift4.0_Timer 的基本使用_swift timer 暂停-程序员宅基地
文章浏览阅读7.9k次。//// ViewController.swift// Day_10_Timer//// Created by dongqiangfei on 2018/10/15.// Copyright 2018年 飞飞. All rights reserved.//import UIKitclass ViewController: UIViewController { ..._swift timer 暂停
元素三大等待-程序员宅基地
文章浏览阅读986次,点赞2次,收藏2次。1.硬性等待让当前线程暂停执行,应用场景:代码执行速度太快了,但是UI元素没有立马加载出来,造成两者不同步,这时候就可以让代码等待一下,再去执行找元素的动作线程休眠,强制等待 Thread.sleep(long mills)package com.example.demo;import org.junit.jupiter.api.Test;import org.openqa.selenium.By;import org.openqa.selenium.firefox.Firefox.._元素三大等待
Java软件工程师职位分析_java岗位分析-程序员宅基地
文章浏览阅读3k次,点赞4次,收藏14次。Java软件工程师职位分析_java岗位分析
Java:Unreachable code的解决方法_java unreachable code-程序员宅基地
文章浏览阅读2k次。Java:Unreachable code的解决方法_java unreachable code
标签data-*自定义属性值和根据data属性值查找对应标签_如何根据data-*属性获取对应的标签对象-程序员宅基地
文章浏览阅读1w次。1、html中设置标签data-*的值 标题 11111 222222、点击获取当前标签的data-url的值$('dd').on('click', function() { var urlVal = $(this).data('ur_如何根据data-*属性获取对应的标签对象