Ubuntu 16.04 LTS Tensorflow-CPU/Cuda9.0 + Cudnn7.0.5 + Tensorflow-GPU_correct kernel headers and development packages in-程序员宅基地
技术标签: 环境配置
概述
- 此教程为Ubuntu 16.04 下 Tensorflow-GPU或者CPU版本的安装
- 安装前,请务必执行1.1.1的操作,验证您的显卡是NIVIDIA的并且支持GPU计算。如果不支持GPU运算,则只能安装Tensorflow-CPU版本,直接跳过1、2、3大标题,从4. Virtualenv + Tensorflow1.5处开始,并选择安装CPU版本
- 注意!!安装CUDA和cuDNN时,都不要安装最新版本,一切按照本篇中的版本进行安装。
1. NVIDIA CUDA Toolkit 9.0
1.1 Pre-installation Actions
1.1.1 Verify the system has a CUDA-capable GPU.
type the following at the command line to get the information of your graphics card
$ lspci | grep -i nvidiaIf your graphics card is from NVIDIA and it is listed in here, your GPU is CUDA-capable.
1.1.2 Verify the system is running a supported version of Linux.
The CUDA Development Tools are only supported on some specific distributions of Linux. These are listed in the CUDA Toolkit release notes.
To determine which distribution and release number you’re running, type the following at the command line:
$ uname -m && cat /etc/*releaseYou should see output similar to the following, modified for your particular system:
x86_64
Red Hat Enterprise Linux Workstation release 6.0 (Santiago)
The x86_64 line indicates you are running on a 64-bit system. The remainder gives information about your distribution.
1.1.3 Verify the system has gcc installed.
To verify the version of gcc installed on your system, type the following on the command line:
$ gcc --versionIf an error message displays, you need to install the development tools from your Linux distribution or obtain a version of gcc and its accompanying toolchain from the Web.
1.1.4 Verify the system has the correct kernel headers and development packages installed.
The kernel headers and development packages for the currently running kernel can be installed with:
$ sudo apt-get install linux-headers-$(uname -r)
1.2 Install
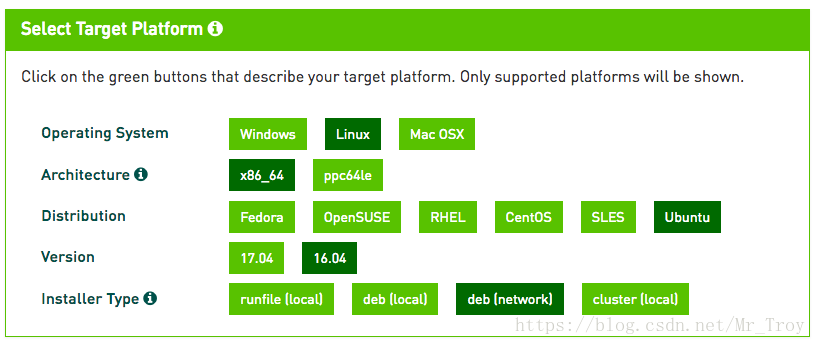
1.2.1 Download the CUDA Toolkit 9.0
1.2.2 Install the CUDA Toolkit 9.0
$ cd ~/Downloads
$ sudo dpkg -i cuda-repo-ubuntu1604_9.0.176-1_amd64.deb
$ sudo apt-key adv --fetch-keys http://developer.download.nvidia.com/compute/cuda/repos/ubuntu1604/x86_64/7fa2af80.pub
$ sudo apt-get update
$ sudo apt-get install cuda-9-0
1.3 Post-installation Actions
$ export PATH=/usr/local/cuda-9.0/bin${
    PATH:+:${
    PATH}}
$ export LD_LIBRARY_PATH=/usr/local/cuda-9.0/lib64\
                         ${
    LD_LIBRARY_PATH:+:${
LD_LIBRARY_PATH}}- 重启以更新环境变量
2. cuDNN v7.0
2.1 Download
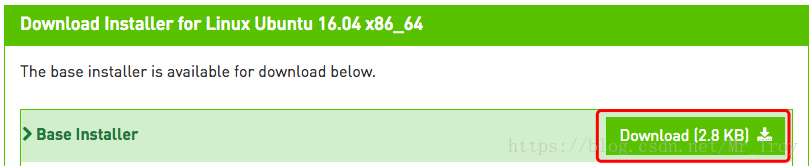
To download the cuDNN , click here

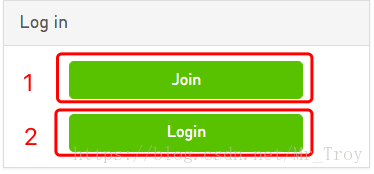
The download of cuDNN requires membership of the NVIDIA Developer Program,so you need to create your account first and then Login.
Do not choose the latest version

Choose the v7.0.5 for CUDA 9.0

Download Runtime 、 Developer 、Code Samples

2.2 Install
$ cd ~/Downloads
$ sudo dpkg -i libcudnn7_7.0.5.15-1+cuda9.0_amd64.deb
$ sudo dpkg -i libcudnn7-dev_7.0.5.15-1+cuda9.0_amd64.deb
$ sudo dpkg -i libcudnn7-doc_7.0.5.15-1+cuda9.0_amd64.deb
2.3 Verifying
To verify that cuDNN is installed and is running properly, compile the mnistCUDNN
- Copy the cuDNN sample to a writable path.
$ cp -r /usr/src/cudnn_samples_v7/ $HOME- Go to the writable path.
$ cd $HOME/cudnn_samples_v7/mnistCUDNN- Compile the mnistCUDNN sample.
$ make clean && make- Run the mnistCUDNN sample.
$ ./mnistCUDNNIf cuDNN is properly installed and running on your Linux system, you will see a
message similar to the following:
Test passed!3. Virtualenv + Tensorflow1.5
3.1 Install the Virtualenv
- 发出下列其中一条命令来安装 pip 和 Virtualenv:
$ sudo apt-get install python3-pip python3-dev python-virtualenv- 发出下列其中一条命令来创建 Virtualenv 环境:
$ sudo virtualenv --system-site-packages -p python3 ~/tensorflow targetDirectory 用于指定 Virtualenv 树的顶层目录。我们的说明中假定 targetDirectory 为 ~/tensorflow,但您可以选择任何目录。
3.2 source the Virtualenv
- 为了避免每次激活输入长命令,我们用tensorflow来代替”source ~/tensorflow/bin/activate”。
- 打开~/.bashrc file文件
$ sudo gedit ~/.bashrc- 文件最后一行追加一行,然后保存并关闭文件
alias tensorflow="source ~/tensorflow/bin/activate"- 无需重启的更新环境变量的方法
$ source ~/.bashrc- 发出下列其中一条命令来激活 Virtualenv 环境:
$ tensorflow- 执行上述 source 命令后,您的提示符应该会变成如下内容则表示成功
(tensorflow)$ 3.3 Install the Tensorflow
发出下列其中一条命令以在处于活动状态的 Virtualenv 环境中安装
TensorFlow-CPU版本(无需安装CUDA和CUDNN)
(tensorflow)$ sudo pip3 install --upgrade tensorflow- TensorFlow-GPU版本(需要安装CUDA和CUDNN)
(tensorflow)$ sudo pip3 install --upgrade tensorflow-gpu4.3 Verifying the Tensorflow
$ tensorflow
(tensorflow)$ Python3
>> import tensorflow as tf
>> hello = tf.constant('Hello, TensorFlow!')
>> sess = tf.Session()
>> print(sess.run(hello))
若如果系统输出以下内容,就说明您可以开始编写 TensorFlow 程序了:
Hello, TensorFlow!智能推荐
Consumer HDU - 3449 (有依赖的背包)_consumer hdu3449-程序员宅基地
文章浏览阅读281次。Consumer 题目链接:HDU - 3449 题意:FJ要去购物,买的商品要用箱子装起来,每个箱子装不同的商品,问FJ能获得的最大价值;只有先买了箱子,才能买固定的物品,所以这是个有依赖的背包问题,对于每个箱子内的物品一定是按01背包看是否要买;对于每个箱子有两个状态,买,不买;买了就必定买了对应商品,那么买了这一箱子后,用剩下的钱买商品;#include <bit..._consumer hdu3449
BCB实现DLL简单demo_bcb封装窗口类dll-程序员宅基地
文章浏览阅读237次。主要分为两个部分:创建DLL文件,调用DLL文件。Note: BCB运行环境:2010 C++ Builder XE创建DLL文件Step1 创建DLL Projecta.1双击BCB软件,接着依次选择:File→New→Other,跳出如下dialoguebox:a.2或者在右侧点击,add new project,跳出如下dialoguebox:b. 选择“Dy..._bcb封装窗口类dll
Stable Diffusion 用2D图片制作3D动态壁纸_stable-diffusion-webui-depthmap-script-程序员宅基地
文章浏览阅读3.5k次。如果想让我们的2D图片动起来可以使用插件在SD中进行加工让图片动起来。这是一个可以从单个图像创建深度图,现在也可以生成3D立体图像对的插件,无论是并排还是浮雕。生成的结果可在3D或全息设备(如VR耳机或Looking Glass显示器)上查看,也可用于具有位移修改器的平面在渲染引擎或游戏引擎中使用,甚至可用于3D打印。Stable Diffusion 用2D图片制作3D动态壁纸。_stable-diffusion-webui-depthmap-script
计算机专业学量化金融CQF 好吗-程序员宅基地
文章浏览阅读307次,点赞4次,收藏9次。计算机专业的学生学习量化金融CQF(Certificate in Quantitative Finance)是一个很好的选择,取决于个人的职业规划、兴趣和目标。
1秒分清empty字符串和null的区别-程序员宅基地
文章浏览阅读1k次。@IT程序猿 微博网友评论:@Belenguar:这是一位程序员在马桶上长达几个小时的思考中领悟出来的?@梁月vv:我以为电影座椅呢。@伯于艾克:难怪我一直没理解,我把他..._null和empty
xman_2019_format(非栈上格式化字符串仅一次利用的爆破)_ctf 格式化字符串 只能利用一次-程序员宅基地
文章浏览阅读1.4k次。xman_2019_format首先检查一下程序的保护机制然后用IDA分析一下存在一个后门函数s执行的内存是非栈上,这类格式化字符串漏洞,一般需要先泄露栈地址,但是这里无法做到,如果泄露了,第二次也没机会来再次利用了。因为这里是一次输入,分步执行。没有循环的交互。因此,最简单的方法是爆破栈的低1字节。通过栈上已有的数据,在栈上布下一个指向函数返回地址栈的指针,然后劫持返回地..._ctf 格式化字符串 只能利用一次
随便推点
2.入门实例_public modelandview getrole(@requestparam("id") lo-程序员宅基地
文章浏览阅读546次。入门实例1先建个动态项目2配置web.xml:配置IOC容器applicationContext.xml的路径和初始化配置调度控制器DispatcherServlet<?xml version="1.0" encoding="UTF-8"?><web-app version="3.1" xmlns="http://xmlns.jcp.org/xml/ns/java..._public modelandview getrole(@requestparam("id") long id) { role role = roles
c++入门 简单语句 空语句 作用域和块 复合语句_c++复合语句和基本语句地位相同吗-程序员宅基地
文章浏览阅读653次。简单语句所谓语句,就相当于自然语言中的句子,是c++的一个编译单位。一个语句中可以只有一个操作,如“i++”,也可以有好多操作,如“da+b+c”,其中有赋值,又有几个加法。几个语句也可以组成条件控制和循环控制的语句结构,因此语句就只是一个单位而已,我们不要用固定思维来看他。空语句c++中大多数的语句都以分号(;)结尾,而前面空无一物的分号也可以称为空语句(null),空语句在编译中会被当成一个语句,但他并没有什么作用。最常见的空语句就是for循环的头部定义的三个语句,在看到for循环的省略形式时就会_c++复合语句和基本语句地位相同吗
java序列化与反序列化详解_java序列化和反序列化-程序员宅基地
文章浏览阅读2.3k次,点赞5次,收藏10次。serialVersionUID - 0x0e 76 fa 9f 59 73 be c6 是16进制转换为二进制,就是生成的值transient修饰的变量不能被序列化;transient只作用于实现 Serializable 接口;transient只能用来修饰普通成员变量字段;不管有没有 transient 修饰,静态变量都不能被序列化;_java序列化和反序列化
安全多方计算之十:联邦学习与安全多方计算-程序员宅基地
文章浏览阅读2.9k次,点赞14次,收藏15次。联邦学习和安全多方计算都是解决数据隐私保护问题的技术,两者既有联系又有区别。本文针对两种的基本概念、应用场景、区别与联系进行了详细介绍。_联邦学习与安全多方计算
Java 创建目录,移动文件,重命名文件名_java创建目录命名-程序员宅基地
文章浏览阅读327次,点赞6次,收藏2次。前言今天要使用Java File类,实现创建目录,移动文件,重命名文件名功能[email protected] public void mvFileTest() { String fileName = "test.txt"; // 目标文件目录 String cameraPath = "C:/develop/project/lmes/ftp_root/camera"; // 源文件 File sourceF_java创建目录命名
利用CSS3做简单的图片上下左右翻转_css img上下翻转-程序员宅基地
文章浏览阅读1.5w次,点赞2次,收藏5次。今天想在页面上加一点效果,所以就做了一个图片翻转 直接上代码吧:1.第一步肯定是在HTML页面上放入图片 <img class="transition" src="XXX.jpg" /></li>2.第二步骤就是在改元素下面添加一个transition,参数分别表示时间和移动的效果 .transition { -webkit-transi..._css img上下翻转