深度学习网络模型 MobileNet系列MobileNet V1、MobileNet V2、MobileNet V3网络详解以及pytorch代码复现_mobilenetv3-程序员宅基地
技术标签: 深度学习 pytorch MobileNet V2 MobileNet V1 MobileNet V3
深度学习网络模型 MobileNet系列MobileNet V1、MobileNet V2、MobileNet V3网络详解以及pytorch代码复现
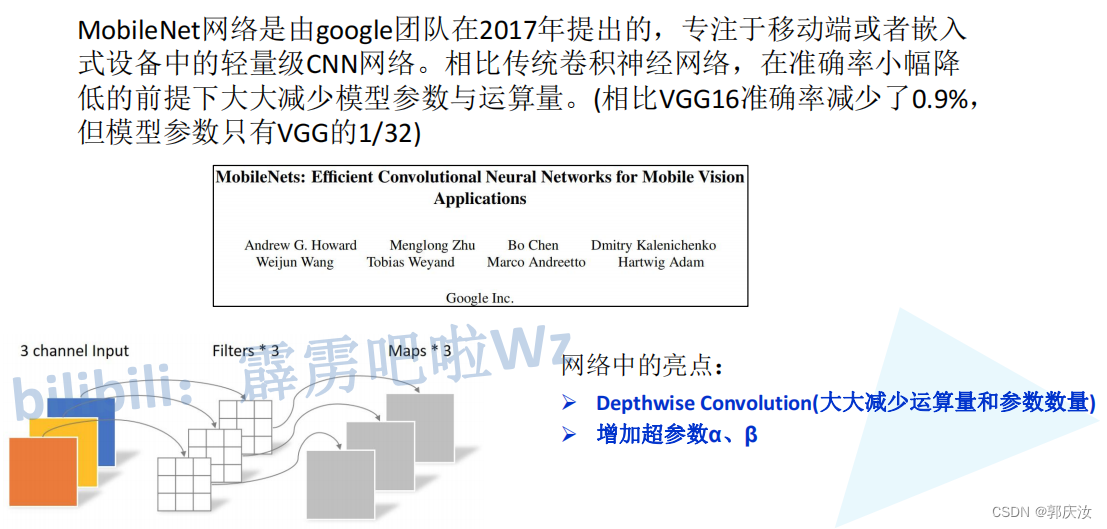
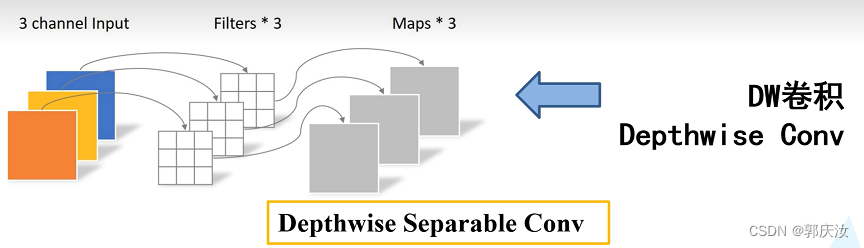
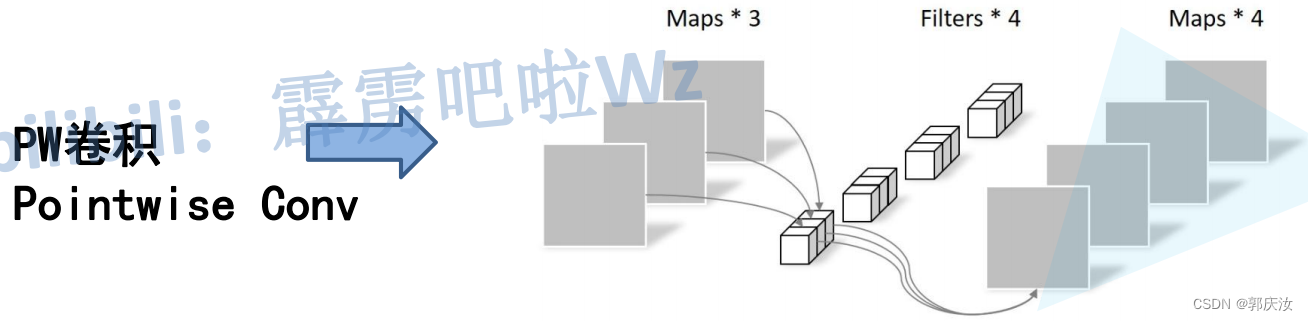
1、DW卷积与普通卷积计算量对比
DW与PW计算量
普通卷积计算量
计算量对比
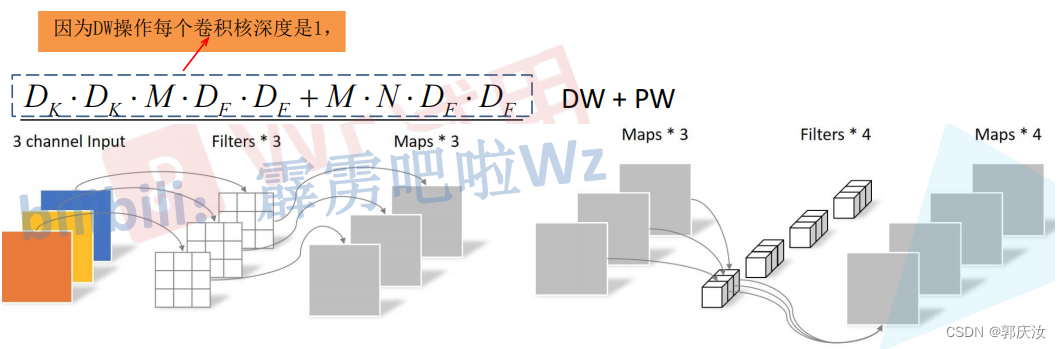
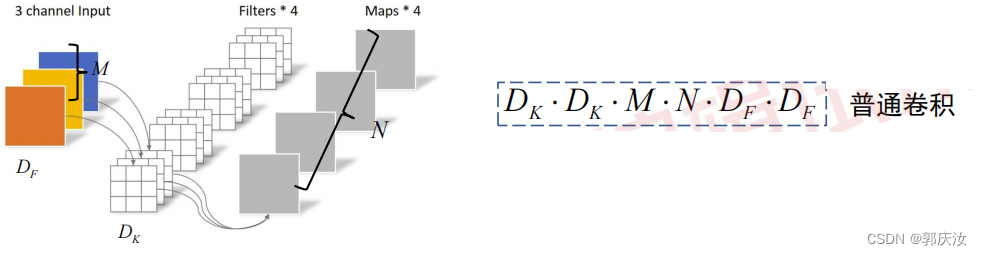

因此理论上普通卷积是DW+PW卷积的8到9倍
2、MobileNet V1
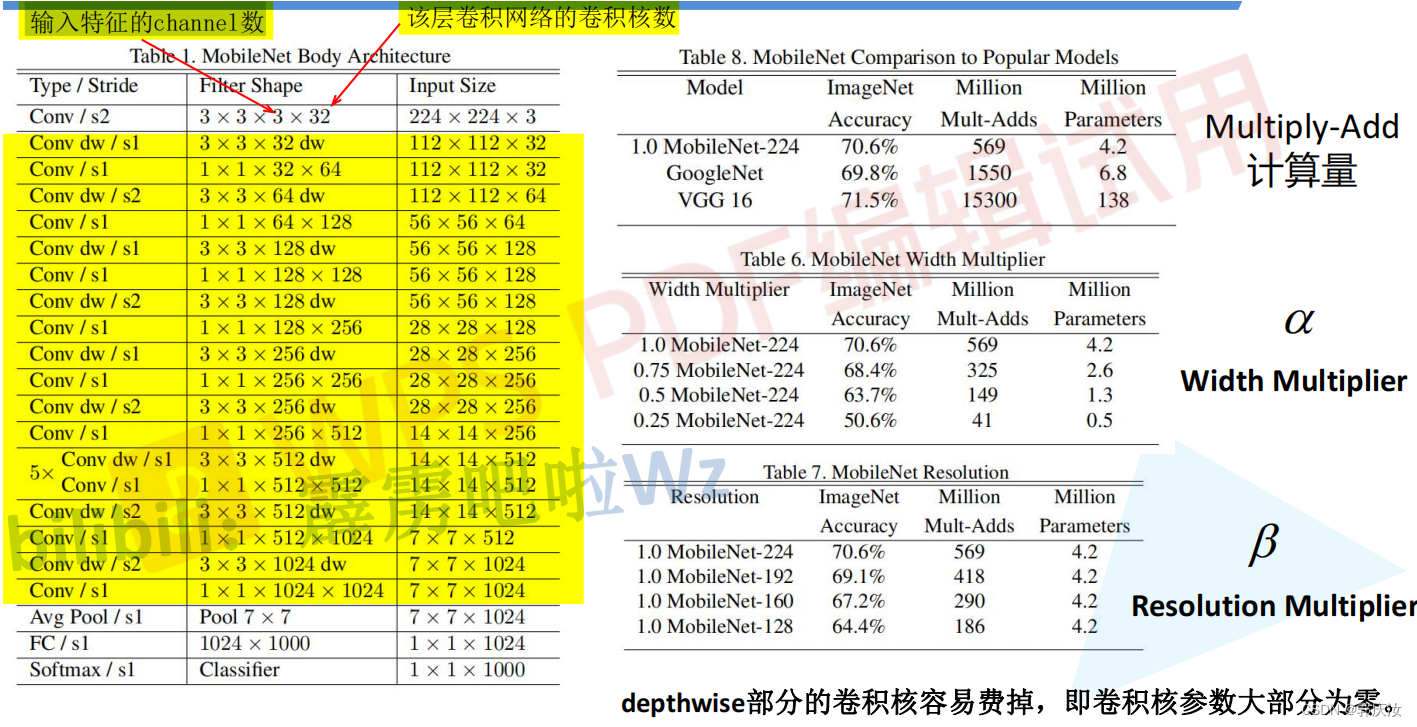
MobileNet V1网络结构
MobileNet V1网络结构代码
import torch.nn as nn
import torch

class MobileNetV1(nn.Module):
    def __init__(self, ch_in, n_classes):
        super(MobileNetV1, self).__init__()

        # 定义普通卷积、BN、激活模块
        def conv_bn(inp, oup, stride):
            return nn.Sequential(
                nn.Conv2d(inp, oup, 3, stride, 1, bias=False),
                nn.BatchNorm2d(oup),
                nn.ReLU(inplace=True)
                )
        # 定义DW、PW卷积模块
        def conv_dw(inp, oup, stride):
            return nn.Sequential(
                # dw
                nn.Conv2d(inp, inp, 3, stride, 1, groups=inp, bias=False),   # DW卷积的卷积核输入与输出的数量一致,且等于分组数
                nn.BatchNorm2d(inp),
                nn.ReLU(inplace=True),

                # pw
                nn.Conv2d(inp, oup, 1, 1, 0, bias=False),
                nn.BatchNorm2d(oup),
                nn.ReLU(inplace=True),
                )

        self.model = nn.Sequential(
            conv_bn(ch_in, 32, 2),
            conv_dw(32, 64, 1),
            conv_dw(64, 128, 2),
            conv_dw(128, 128, 1),
            conv_dw(128, 256, 2),
            conv_dw(256, 256, 1),
            conv_dw(256, 512, 2),
            conv_dw(512, 512, 1),
            conv_dw(512, 512, 1),
            conv_dw(512, 512, 1),
            conv_dw(512, 512, 1),
            conv_dw(512, 512, 1),
            conv_dw(512, 1024, 2),
            conv_dw(1024, 1024, 1),
            nn.AdaptiveAvgPool2d(1)
        )
        self.fc = nn.Linear(1024, n_classes)

    def forward(self, x):
        x = self.model(x)
        x = x.view(-1, 1024)
        x = self.fc(x)
        return x

if __name__=='__main__':
    # model check
    model = MobileNetV1(ch_in=3, n_classes=5)
    print(model)
    random_data=torch.rand([1,3,224,224])
    result = model(random_data)
    print(result)
3、MobileNet V2
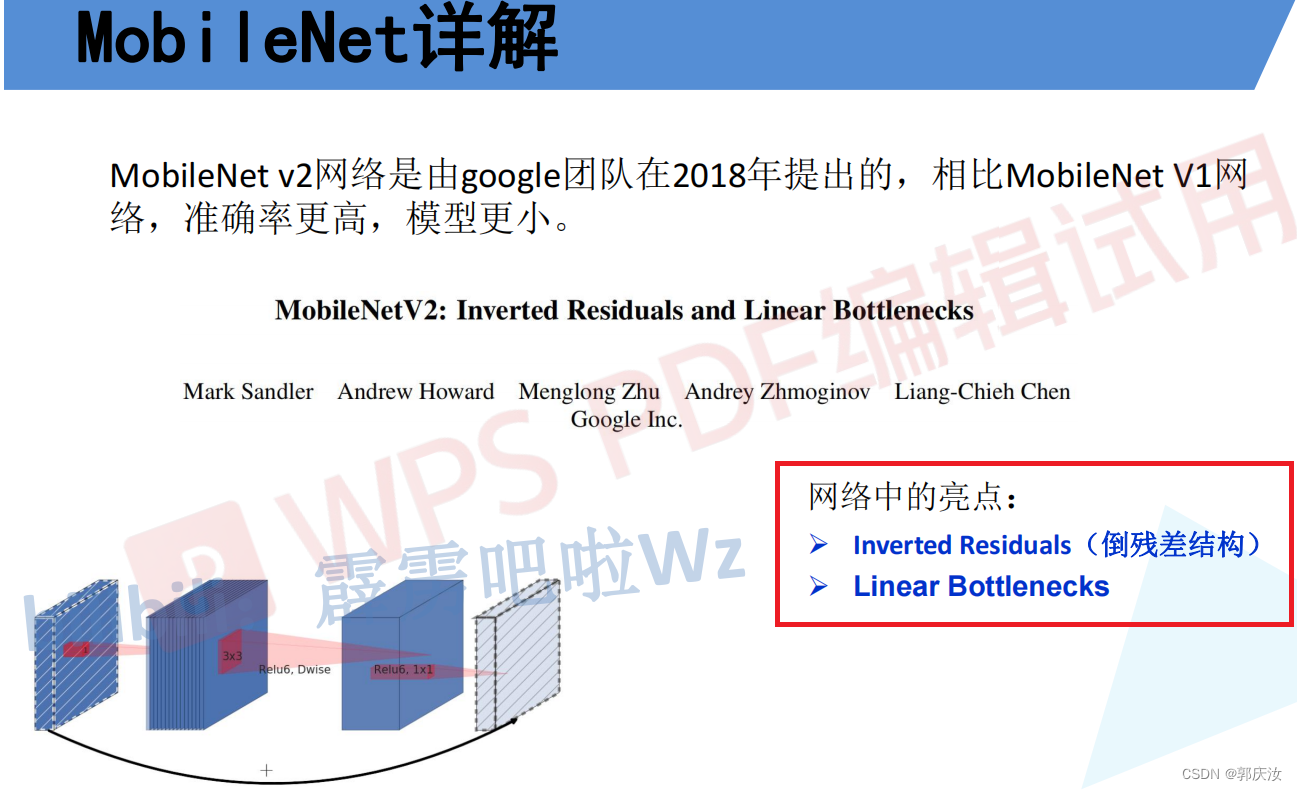
倒残差结构模块
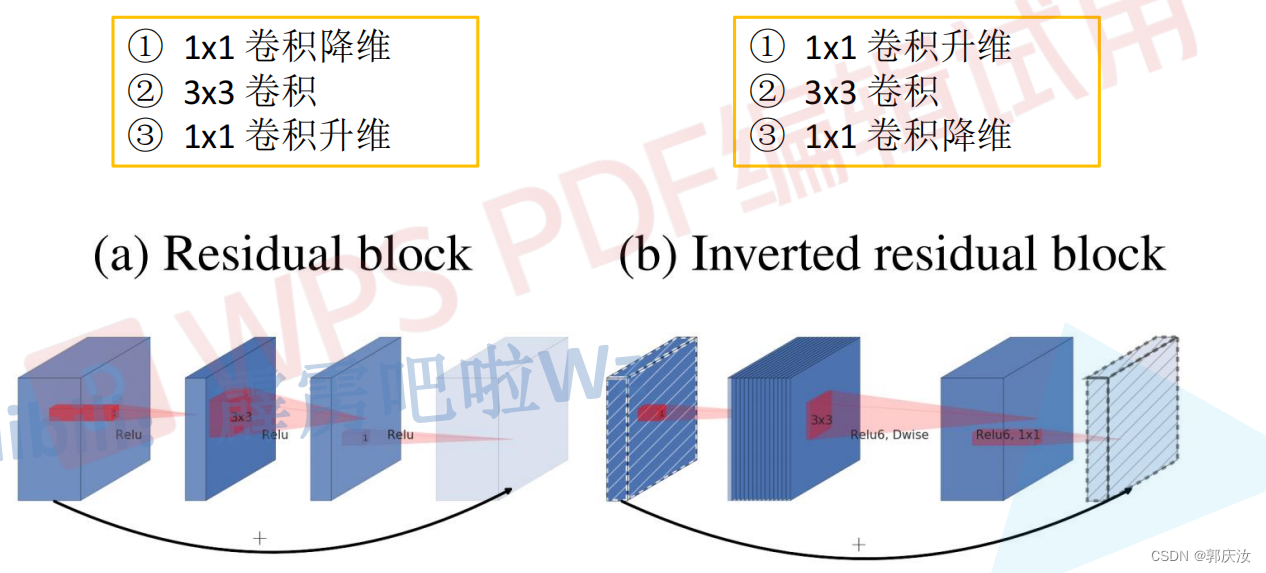
Residual blok与Inverted residual block对比:
- Residual blok:先采用1 x 1的卷积核来对特征矩阵进行压缩,减少输入特征矩阵的channel,再通过3 x 3的卷积核进行特征处理,再采用1 x 1的卷积核来扩充channel维度,形成了两头大中间小的瓶颈结构。并且3 x 3的卷积后面采用Relu激活函数。
- Inverted residual block:先采用1 x 1的卷积核进行升高channel维度的操作,通过卷积核大小为3 x 3的DW模块进行卷积,再通过1 x 1的卷积进行降低channel维度的处理,形成两头小中间大的结构。并且3 x 3的卷积后面采用Relu6激活函数。
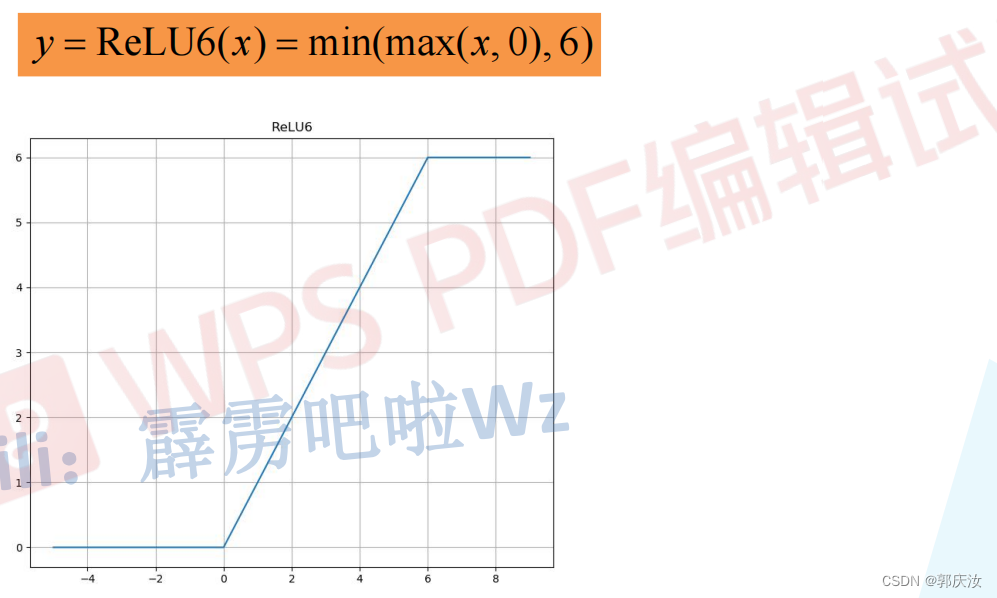
- Relu6激活函数
- 倒残差结构详细示意图

倒残差模块代码
# 定义普通卷积、BN结构
class ConvBNReLU(nn.Sequential):
    def __init__(self, in_channel, out_channel, kernel_size=3, stride=1, groups=1):
        padding = (kernel_size - 1) // 2  # padding的设置根据kernel_size来定,如果kernel_size为3,则padding设置为1;如果kernel_size为1,为padding为0
        super(ConvBNReLU, self).__init__(
            # 在pytorch中,如果设置的 group=1的话,就为普通卷积;如果设置的值为输入特征矩阵的深度的话(即in_channel),则为深度卷积(deptwise conv),并且Dw卷积的输出特征矩阵的深度等于输入特征矩阵的深度
            nn.Conv2d(in_channel, out_channel, kernel_size, stride, padding, groups=groups, bias=False),  # groups=1,表示普通的卷积;因为接下来要使用的是BN层,此处的偏置不起任何作用,所以设置为1
            nn.BatchNorm2d(out_channel),
            nn.ReLU6(inplace=True)    # 此处使用的是Relu6激活函数
        )
# 定义mobile网络基本结构--即到残差结构
class InvertedResidual(nn.Module):
    def __init__(self, in_channel, out_channel, stride, expand_ratio):
        super(InvertedResidual, self).__init__()
        hidden_channel = in_channel * expand_ratio
        self.use_shortcut = stride == 1 and in_channel == out_channel  # stride == 1 and in_channel == out_channel:保证输入矩阵与输出矩阵的shape一致,且通道数也一致,这样才可以进行shurtcut

        layers = []
        if expand_ratio != 1:  # 表示如果扩展因子不为1时,则使用1x1的卷积层(即对输入特征矩阵的深度进行扩充)
            # 1x1 pointwise conv
            layers.append(ConvBNReLU(in_channel, hidden_channel, kernel_size=1))
        layers.extend([
            # 3x3 depthwise conv
            # 在pytorch中,如果设置的 group=1的话,就为普通卷积;如果设置的值为输入特征矩阵的深度的话(即in_channel),则为深度卷积(deptwise conv),并且Dw卷积的输出特征矩阵的深度等于输入特征矩阵的深度
            ConvBNReLU(hidden_channel, hidden_channel, stride=stride, groups=hidden_channel),
            # 1x1 pointwise conv(linear)  因为其后跟随的是线性激活函数,即y=x,所以其后面不在跟随激活函数
            nn.Conv2d(hidden_channel, out_channel, kernel_size=1, bias=False),
            nn.BatchNorm2d(out_channel),
        ])

        self.conv = nn.Sequential(*layers)

    def forward(self, x):
        if self.use_shortcut:
            return x + self.conv(x)
        else:
            return self.conv(x)
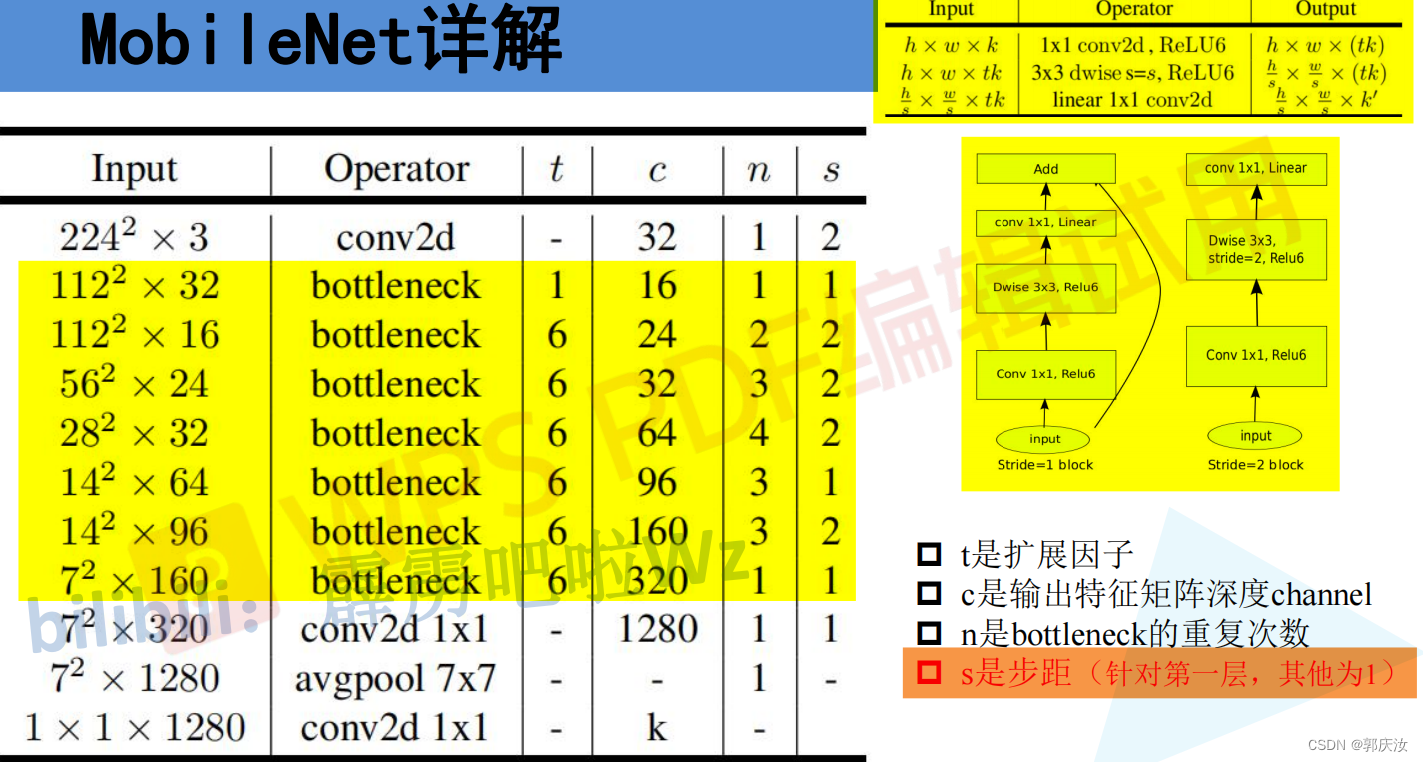
MobileNet V2详细网络结构
MobileNet V2网络结构代码
from torch import nn
import torch


def _make_divisible(ch, divisor=8, min_ch=None):
    """
        将输入的通道数(ch)调整到divisor的整数倍,方便硬件加速
    This function is taken from the original tf repo.
    It ensures that all layers have a channel number that is divisible by 8
    It can be seen here:
    https://github.com/tensorflow/models/blob/master/research/slim/nets/mobilenet/mobilenet.py
    """
    if min_ch is None:
        min_ch = divisor
    new_ch = max(min_ch, int(ch + divisor / 2) // divisor * divisor)
    # Make sure that round down does not go down by more than 10%.
    if new_ch < 0.9 * ch:
        new_ch += divisor
    return new_ch

# 定义普通卷积、BN结构
class ConvBNReLU(nn.Sequential):
    def __init__(self, in_channel, out_channel, kernel_size=3, stride=1, groups=1):
        padding = (kernel_size - 1) // 2  # padding的设置根据kernel_size来定,如果kernel_size为3,则padding设置为1;如果kernel_size为1,为padding为0
        super(ConvBNReLU, self).__init__(
            # 在pytorch中,如果设置的 group=1的话,就为普通卷积;如果设置的值为输入特征矩阵的深度的话(即in_channel),则为深度卷积(deptwise conv),并且Dw卷积的输出特征矩阵的深度等于输入特征矩阵的深度
            nn.Conv2d(in_channel, out_channel, kernel_size, stride, padding, groups=groups, bias=False),  # groups=1,表示普通的卷积;因为接下来要使用的是BN层,此处的偏置不起任何作用,所以设置为1
            nn.BatchNorm2d(out_channel),
            nn.ReLU6(inplace=True)    # 此处使用的是Relu6激活函数
        )

# 定义mobile网络基本结构--即到残差结构
class InvertedResidual(nn.Module):
    def __init__(self, in_channel, out_channel, stride, expand_ratio):
        super(InvertedResidual, self).__init__()
        hidden_channel = in_channel * expand_ratio
        self.use_shortcut = stride == 1 and in_channel == out_channel  # stride == 1 and in_channel == out_channel:保证输入矩阵与输出矩阵的shape一致,且通道数也一致,这样才可以进行shurtcut

        layers = []
        if expand_ratio != 1:  # 表示如果扩展因子不为1时,则使用1x1的卷积层(即对输入特征矩阵的深度进行扩充)
            # 1x1 pointwise conv
            layers.append(ConvBNReLU(in_channel, hidden_channel, kernel_size=1))
        layers.extend([
            # 3x3 depthwise conv
            # 在pytorch中,如果设置的 group=1的话,就为普通卷积;如果设置的值为输入特征矩阵的深度的话(即in_channel),则为深度卷积(deptwise conv),并且Dw卷积的输出特征矩阵的深度等于输入特征矩阵的深度
            ConvBNReLU(hidden_channel, hidden_channel, stride=stride, groups=hidden_channel),
            # 1x1 pointwise conv(linear)  因为其后跟随的是线性激活函数,即y=x,所以其后面不在跟随激活函数
            nn.Conv2d(hidden_channel, out_channel, kernel_size=1, bias=False),
            nn.BatchNorm2d(out_channel),
        ])

        self.conv = nn.Sequential(*layers)

    def forward(self, x):
        if self.use_shortcut:
            return x + self.conv(x)
        else:
            return self.conv(x)

# 定义mobileNetV2网络
class MobileNetV2(nn.Module):
    def __init__(self, num_classes=1000, alpha=1.0, round_nearest=8):
        super(MobileNetV2, self).__init__()
        block = InvertedResidual
        input_channel = _make_divisible(32 * alpha, round_nearest)  # 将卷积核的个数调整为8的整数倍
        last_channel = _make_divisible(1280 * alpha, round_nearest)

        inverted_residual_setting = [
            # t, c, n, s
            [1, 16, 1, 1],
            [6, 24, 2, 2],
            [6, 32, 3, 2],
            [6, 64, 4, 2],
            [6, 96, 3, 1],
            [6, 160, 3, 2],
            [6, 320, 1, 1],
        ]

        features = []
        # conv1 layer
        features.append(ConvBNReLU(3, input_channel, stride=2))   # 添加第一层普通卷积层
        # building inverted residual residual blockes
        for t, c, n, s in inverted_residual_setting:
            output_channel = _make_divisible(c * alpha, round_nearest)   # 根据alpha因子调整卷积核的个数
            for i in range(n):   # 循环添加倒残差模块
                stride = s if i == 0 else 1  # s表示的是倒残差模块结构中第一层卷积对应的步距,剩余层都是1
                features.append(block(input_channel, output_channel, stride, expand_ratio=t))  # 添加一系列倒残差结构
                input_channel = output_channel
        # building last several layers
        features.append(ConvBNReLU(input_channel, last_channel, 1))  # 构建最后一层卷积层
        # combine feature layers
        self.features = nn.Sequential(*features)

        # building classifier
        self.avgpool = nn.AdaptiveAvgPool2d((1, 1))  # 采用自适应平均采样层
        self.classifier = nn.Sequential(
            nn.Dropout(0.2),
            nn.Linear(last_channel, num_classes)
        )

        # weight initialization  初始化全只能怪
        for m in self.modules():
            if isinstance(m, nn.Conv2d):
                nn.init.kaiming_normal_(m.weight, mode='fan_out')
                if m.bias is not None:
                    nn.init.zeros_(m.bias)
            elif isinstance(m, nn.BatchNorm2d):
                nn.init.ones_(m.weight)
                nn.init.zeros_(m.bias)
            elif isinstance(m, nn.Linear):
                nn.init.normal_(m.weight, 0, 0.01)   # 初始化为正态分布的函数,均值为0,方差为0.01
                nn.init.zeros_(m.bias)

    def forward(self, x):
        x = self.features(x)
        x = self.avgpool(x)
        x = torch.flatten(x, 1)
        x = self.classifier(x)
        return x


if __name__ == '__main__':
    divisible = _make_divisible(1)
    print(divisible)
4、MobileNet V3
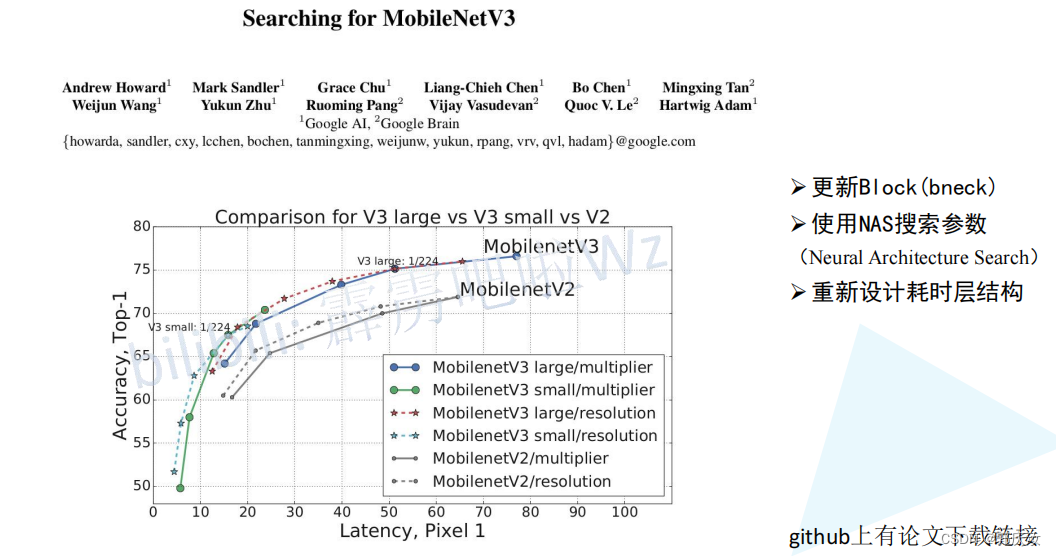
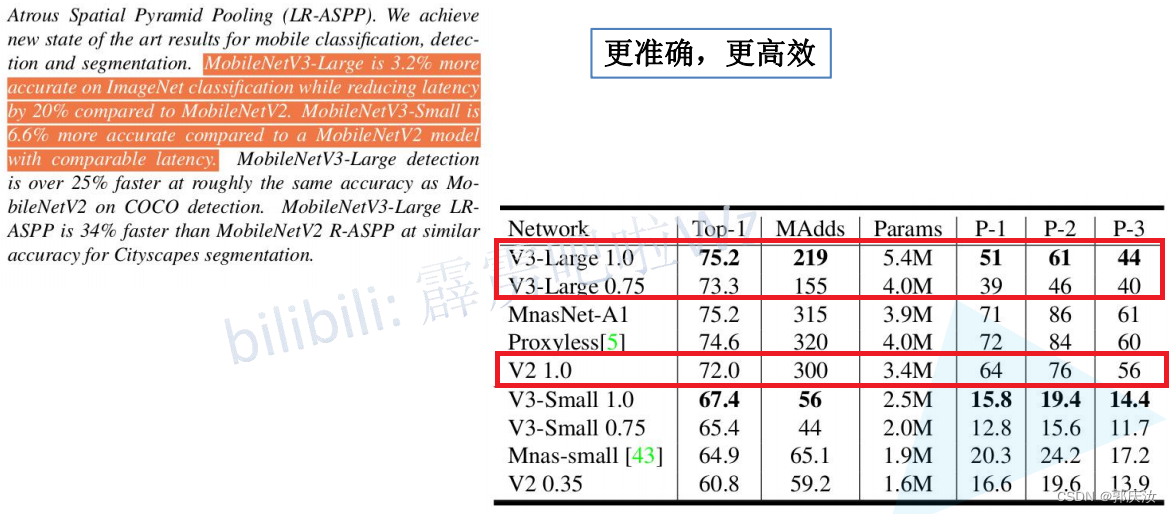
创新点
- 加入了注意力机制SE模块
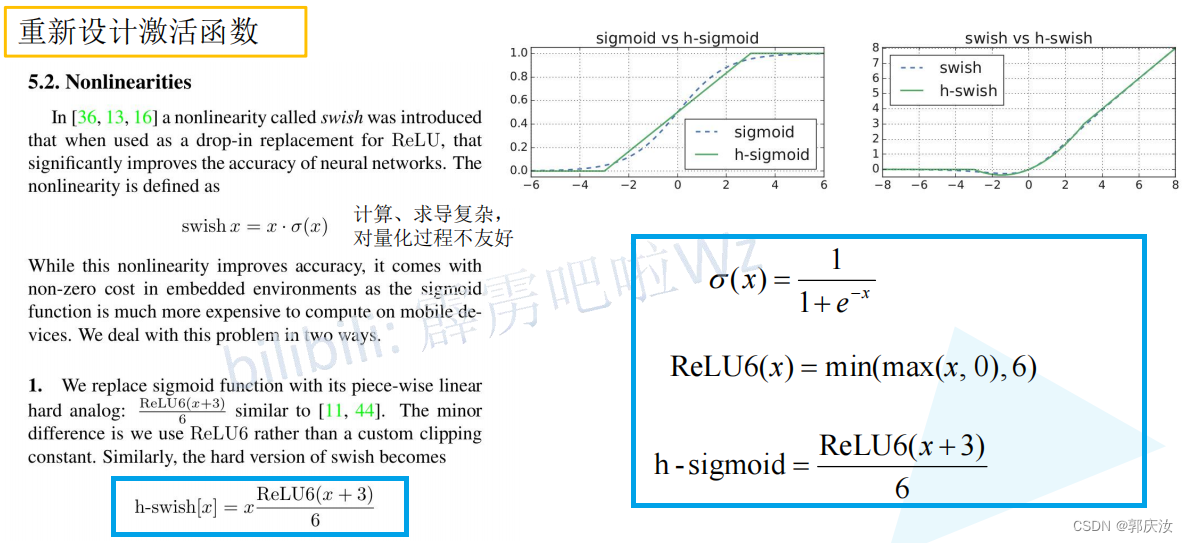
- 使用的新的激活函数
- 激活函数

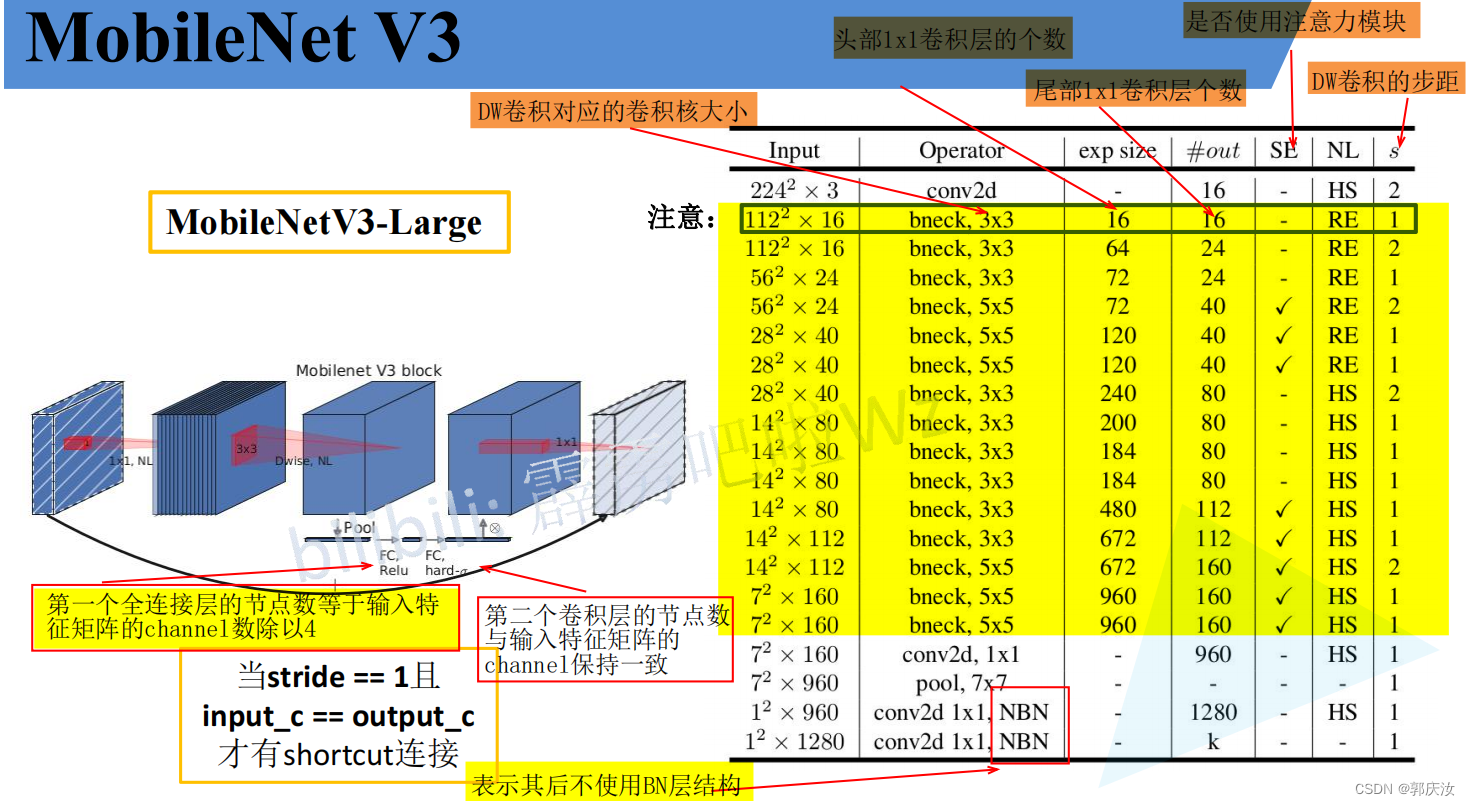
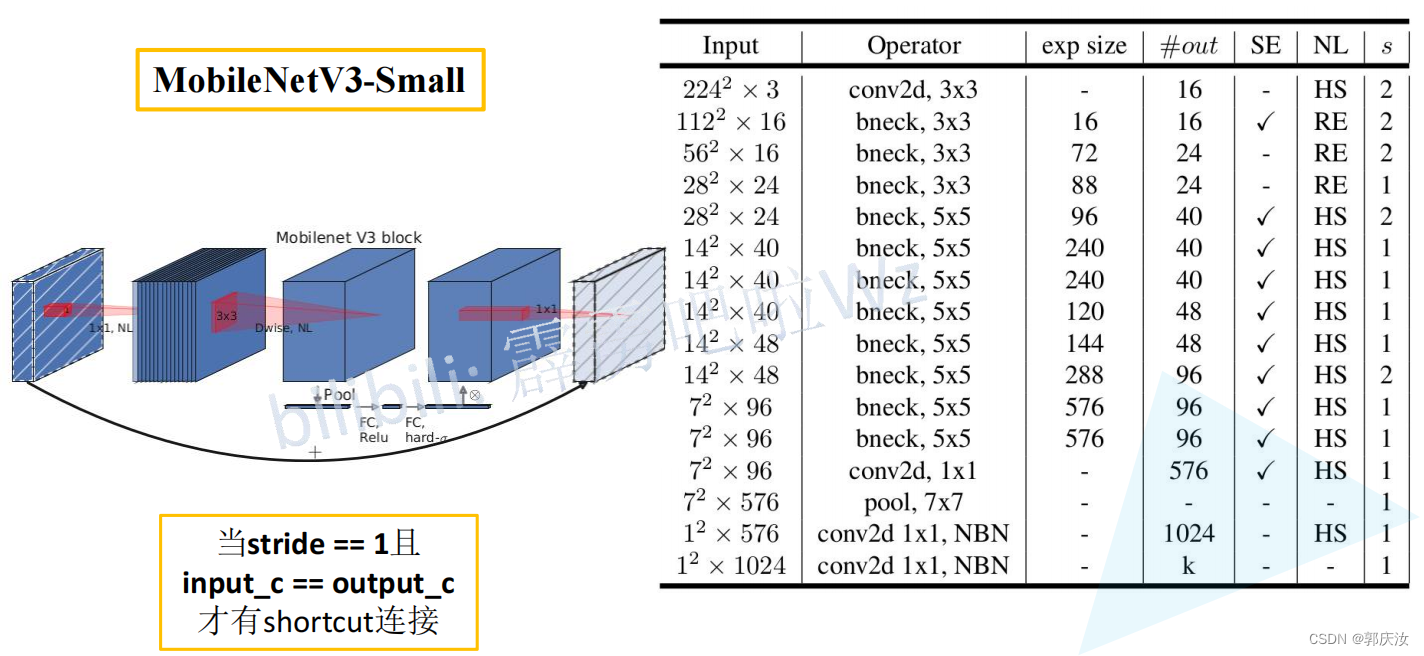
MobileNet V3详细网络结构
# 定义block的配置类
class InvertedResidualConfig:
    def __init__(self,
                 input_c: int,  # block模块中的第一个1x1卷积层的输入channel数
                 kernel: int,   # depthwise卷积的卷积核大小
                 expanded_c: int,   # block模块中的第一个1x1卷积层的输出channel数
                 out_c: int,  # 经过block模块中第二个1x1卷积层处理过后得到的channel数
                 use_se: bool,  # 是否使用注意力机制模块
                 activation: str,   # 激活方式
                 stride: int,       # 步长
                 width_multi: float):  # width_multi:调节每个卷积层所使用channel的倍率因子
        self.input_c = self.adjust_channels(input_c, width_multi)
        self.kernel = kernel
        self.expanded_c = self.adjust_channels(expanded_c, width_multi)
        self.out_c = self.adjust_channels(out_c, width_multi)
        self.use_se = use_se
        self.use_hs = activation == "HS"  # whether using h-swish activation
        self.stride = stride

    @staticmethod
    def adjust_channels(channels: int, width_multi: float):
        return _make_divisible(channels * width_multi, 8)
注意力机制SE模块代码
# 注意力机制模块(SE模块,即两个全连接层)   该模块的基本流程是:先进行自适应平均池化(1x1)———>1x1的卷积层———>relu激活层———>1x1的卷积池化———>hardsigmoid()激活函数激活
class SqueezeExcitation(nn.Module):
    def __init__(self, input_c: int, squeeze_factor: int = 4):
        super(SqueezeExcitation, self).__init__()
        squeeze_c = _make_divisible(input_c // squeeze_factor, 8)    # 获得距离该数最近的8的整数倍的数字
        self.fc1 = nn.Conv2d(input_c, squeeze_c, 1)    # 该卷积的输出的squeeze_c是输入input_c的1/4
        self.fc2 = nn.Conv2d(squeeze_c, input_c, 1)

    def forward(self, x: Tensor) -> Tensor:
        scale = F.adaptive_avg_pool2d(x, output_size=(1, 1))   # 将特征矩阵每一个channel上的数据给平均池化到1x1的大小
        scale = self.fc1(scale)
        scale = F.relu(scale, inplace=True)
        scale = self.fc2(scale)
        scale = F.hardsigmoid(scale, inplace=True)   # 激活函数
        return scale * x   # 将得到的数据与传入的对应channel数据进行相乘
InvertedResidual模块代码
# 定义block模块
# 此为block模块,其包含第一个1x1卷积层、DeptWis卷积层、SE注意力机制层(判断是否需求)、第二个1x1卷积层、激活函数(需要判断是否是非线性激活)
class InvertedResidual(nn.Module):
    def __init__(self,
                 cnf: InvertedResidualConfig,   # cnf:配置类参数
                 norm_layer: Callable[..., nn.Module]):      # norm_layer:# BN层
        super(InvertedResidual, self).__init__()

        if cnf.stride not in [1, 2]:  # 判断某一层的配置文件,其步长是否满足条件
            raise ValueError("illegal stride value.")

        # 判断是否进行短连接
        self.use_res_connect = (cnf.stride == 1 and cnf.input_c == cnf.out_c)  # 只有当步长为1,并且输入通道等于输出通道数

        layers: List[nn.Module] = []
        activation_layer = nn.Hardswish if cnf.use_hs else nn.ReLU    # 判断当前的激活函数类型

        # expand
        # 判断是否相等,如果相等,则不适用1x1的卷积层增加channel维度;不相等的话,才使用该层进行升维度
        if cnf.expanded_c != cnf.input_c:
            layers.append(ConvBNActivation(cnf.input_c,
                                           cnf.expanded_c,
                                           kernel_size=1,
                                           norm_layer=norm_layer,
                                           activation_layer=activation_layer))

        # depthwise
        layers.append(ConvBNActivation(cnf.expanded_c,
                                       cnf.expanded_c,
                                       kernel_size=cnf.kernel,   # depthwise卷积的卷积核大小
                                       stride=cnf.stride,
                                       groups=cnf.expanded_c,
                                       norm_layer=norm_layer,   # BN层
                                       activation_layer=activation_layer))

        # 判断是否需要添加SE模块
        if cnf.use_se:
            layers.append(SqueezeExcitation(cnf.expanded_c))

        # project
        layers.append(ConvBNActivation(cnf.expanded_c,
                                       cnf.out_c,
                                       kernel_size=1,
                                       norm_layer=norm_layer,  # BN 层
                                       activation_layer=nn.Identity))   # 此层的activation_layer就是进行里普通的线性激活,没有做任何的处理

        self.block = nn.Sequential(*layers)
        self.out_channels = cnf.out_c
        self.is_strided = cnf.stride > 1

    def forward(self, x: Tensor) -> Tensor:
        result = self.block(x)
        if self.use_res_connect:
            result += x   # 进行shortcut连接

        return result
整体代码
from typing import Callable, List, Optional

import torch
from torch import nn, Tensor
from torch.nn import functional as F
from functools import partial

# 得到同传入数据最近的8的整数倍数值
def _make_divisible(ch, divisor=8, min_ch=None):
    """
    This function is taken from the original tf repo.
    It ensures that all layers have a channel number that is divisible by 8
    It can be seen here:
    https://github.com/tensorflow/models/blob/master/research/slim/nets/mobilenet/mobilenet.py
    """
    if min_ch is None:
        min_ch = divisor
    new_ch = max(min_ch, int(ch + divisor / 2) // divisor * divisor)
    # Make sure that round down does not go down by more than 10%.
    if new_ch < 0.9 * ch:
        new_ch += divisor
    return new_ch

# 普通卷积、BN、激活层模块
class ConvBNActivation(nn.Sequential):
    def __init__(self,
                 in_planes: int,   # 输入特征矩阵的通道
                 out_planes: int,  # 输出特征矩阵的通道
                 kernel_size: int = 3,
                 stride: int = 1,
                 groups: int = 1,
                 norm_layer: Optional[Callable[..., nn.Module]] = None,   # 在卷积后的BN层
                 activation_layer: Optional[Callable[..., nn.Module]] = None):  # 激活函数
        padding = (kernel_size - 1) // 2
        if norm_layer is None:
            norm_layer = nn.BatchNorm2d
        if activation_layer is None:
            activation_layer = nn.ReLU6
        super(ConvBNActivation, self).__init__(nn.Conv2d(in_channels=in_planes,
                                                         out_channels=out_planes,
                                                         kernel_size=kernel_size,
                                                         stride=stride,
                                                         padding=padding,
                                                         groups=groups,
                                                         bias=False),
                                               norm_layer(out_planes),   # BN层
                                               activation_layer(inplace=True))

# 注意力机制模块(SE模块,即两个全连接层)   该模块的基本流程是:先进行自适应平均池化(1x1)———>1x1的卷积层———>relu激活层———>1x1的卷积池化———>hardsigmoid()激活函数激活
class SqueezeExcitation(nn.Module):
    def __init__(self, input_c: int, squeeze_factor: int = 4):
        super(SqueezeExcitation, self).__init__()
        squeeze_c = _make_divisible(input_c // squeeze_factor, 8)    # 获得距离该数最近的8的整数倍的数字
        self.fc1 = nn.Conv2d(input_c, squeeze_c, 1)    # 该卷积的输出的squeeze_c是输入input_c的1/4  其作用与全连接层一样
        self.fc2 = nn.Conv2d(squeeze_c, input_c, 1)

    def forward(self, x: Tensor) -> Tensor:
        scale = F.adaptive_avg_pool2d(x, output_size=(1, 1))   # 将特征矩阵每一个channel上的数据给平均池化到1x1的大小
        scale = self.fc1(scale)
        scale = F.relu(scale, inplace=True)
        scale = self.fc2(scale)
        scale = F.hardsigmoid(scale, inplace=True)   # 激活函数
        return scale * x   # 将得到的数据与传入的对应channel数据进行相乘


# 定义block的配置类
class InvertedResidualConfig:
    def __init__(self,
                 input_c: int,  # block模块中的第一个1x1卷积层的输入channel数
                 kernel: int,   # depthwise卷积的卷积核大小
                 expanded_c: int,   # block模块中的第一个1x1卷积层的输出channel数
                 out_c: int,  # 经过block模块中第二个1x1卷积层处理过后得到的channel数
                 use_se: bool,  # 是否使用注意力机制模块
                 activation: str,   # 激活方式
                 stride: int,       # 步长
                 width_multi: float):  # width_multi:调节每个卷积层所使用channel的倍率因子
        self.input_c = self.adjust_channels(input_c, width_multi)
        self.kernel = kernel
        self.expanded_c = self.adjust_channels(expanded_c, width_multi)
        self.out_c = self.adjust_channels(out_c, width_multi)
        self.use_se = use_se
        self.use_hs = activation == "HS"  # whether using h-swish activation
        self.stride = stride

    @staticmethod
    def adjust_channels(channels: int, width_multi: float):
        return _make_divisible(channels * width_multi, 8)


# 定义block模块
# 此为block模块,其包含第一个1x1卷积层、DeptWis卷积层、SE注意力机制层(判断是否需求)、第二个1x1卷积层、激活函数(需要判断是否是非线性激活)
class InvertedResidual(nn.Module):
    def __init__(self,
                 cnf: InvertedResidualConfig,   # cnf:配置类参数
                 norm_layer: Callable[..., nn.Module]):      # norm_layer:# BN层
        super(InvertedResidual, self).__init__()

        if cnf.stride not in [1, 2]:  # 判断某一层的配置文件,其步长是否满足条件
            raise ValueError("illegal stride value.")

        # 判断是否进行短连接
        self.use_res_connect = (cnf.stride == 1 and cnf.input_c == cnf.out_c)  # 只有当步长为1,并且输入通道等于输出通道数

        layers: List[nn.Module] = []
        activation_layer = nn.Hardswish if cnf.use_hs else nn.ReLU    # 判断当前的激活函数类型

        # expand
        # 判断是否相等,如果相等,则不适用1x1的卷积层增加channel维度;不相等的话,才使用该层进行升维度
        if cnf.expanded_c != cnf.input_c:
            layers.append(ConvBNActivation(cnf.input_c,
                                           cnf.expanded_c,
                                           kernel_size=1,
                                           norm_layer=norm_layer,
                                           activation_layer=activation_layer))

        # depthwise
        layers.append(ConvBNActivation(cnf.expanded_c,
                                       cnf.expanded_c,
                                       kernel_size=cnf.kernel,   # depthwise卷积的卷积核大小
                                       stride=cnf.stride,
                                       groups=cnf.expanded_c,    # 深度DW卷积
                                       norm_layer=norm_layer,   # BN层
                                       activation_layer=activation_layer))

        # 判断是否需要添加SE模块
        if cnf.use_se:
            layers.append(SqueezeExcitation(cnf.expanded_c))

        # project
        layers.append(ConvBNActivation(cnf.expanded_c,
                                       cnf.out_c,
                                       kernel_size=1,
                                       norm_layer=norm_layer,  # BN 层
                                       activation_layer=nn.Identity))   # 此层的activation_layer就是进行里普通的线性激活,没有做任何的处理

        self.block = nn.Sequential(*layers)
        self.out_channels = cnf.out_c
        self.is_strided = cnf.stride > 1

    def forward(self, x: Tensor) -> Tensor:
        result = self.block(x)
        if self.use_res_connect:
            result += x   # 进行shortcut连接

        return result


# MobileNetV3网络结构基础框架:其包括:模型的第一层卷积层———>nx【bneckBlock模块】———>1x1的卷积层———>自适应平均池化层———>全连接层———>全连接层
class MobileNetV3(nn.Module):
    def __init__(self,
                 inverted_residual_setting: List[InvertedResidualConfig],           # beneckBlock结构一系列参数列表
                 last_channel: int,   # 对应的是倒数第二个全连接层输出节点数  1280
                 num_classes: int = 1000,  # 类别个数
                 block: Optional[Callable[..., nn.Module]] = None,   # InvertedResidual核心模块
                 norm_layer: Optional[Callable[..., nn.Module]] = None):
        super(MobileNetV3, self).__init__()

        if not inverted_residual_setting:
            raise ValueError("The inverted_residual_setting should not be empty.")
        elif not (isinstance(inverted_residual_setting, List) and
                  all([isinstance(s, InvertedResidualConfig) for s in inverted_residual_setting])):
            raise TypeError("The inverted_residual_setting should be List[InvertedResidualConfig]")

        if block is None:
            block = InvertedResidual   # block类

        if norm_layer is None:
            norm_layer = partial(nn.BatchNorm2d, eps=0.001, momentum=0.01)  # partial()为python方法,即为nn.BatchNorm2d传入默认的两个参数

        layers: List[nn.Module] = []

        # building first layer
        # 构建第一层卷积结构
        firstconv_output_c = inverted_residual_setting[0].input_c   # 表示第一个卷积层输出的channel数
        layers.append(ConvBNActivation(3,   # 输入图像数据的channel数
                                       firstconv_output_c,    # 输出channel
                                       kernel_size=3,
                                       stride=2,
                                       norm_layer=norm_layer,
                                       activation_layer=nn.Hardswish))
        # building inverted residual blocks
        # 利用循环的方式添加block模块,将每层的配置文件传给block
        for cnf in inverted_residual_setting:
            layers.append(block(cnf, norm_layer))

        # building last several layers
        lastconv_input_c = inverted_residual_setting[-1].out_c  # 最后的bneckblock的输出channel
        lastconv_output_c = 6 * lastconv_input_c    # lastconv_output_c 与 最后的bneckblock的输出channel数是六倍的关系

        # 定义最后一层的卷积层
        layers.append(ConvBNActivation(lastconv_input_c,   # 最后的bneckblock的输出channel数
                                       lastconv_output_c,   # lastconv_output_c 与 最后的bneckblock的输出channel数是六倍的关系
                                       kernel_size=1,
                                       norm_layer=norm_layer,
                                       activation_layer=nn.Hardswish))
        self.features = nn.Sequential(*layers)
        self.avgpool = nn.AdaptiveAvgPool2d(1)
        self.classifier = nn.Sequential(nn.Linear(lastconv_output_c, last_channel),
                                        nn.Hardswish(inplace=True),
                                        nn.Dropout(p=0.2, inplace=True),
                                        nn.Linear(last_channel, num_classes))

        # initial weights
        for m in self.modules():
            if isinstance(m, nn.Conv2d):
                nn.init.kaiming_normal_(m.weight, mode="fan_out")
                if m.bias is not None:
                    nn.init.zeros_(m.bias)
            elif isinstance(m, (nn.BatchNorm2d, nn.GroupNorm)):
                nn.init.ones_(m.weight)
                nn.init.zeros_(m.bias)
            elif isinstance(m, nn.Linear):
                nn.init.normal_(m.weight, 0, 0.01)
                nn.init.zeros_(m.bias)

    def _forward_impl(self, x: Tensor) -> Tensor:
        x = self.features(x)
        x = self.avgpool(x)
        x = torch.flatten(x, 1)
        x = self.classifier(x)

        return x

    def forward(self, x: Tensor) -> Tensor:
        return self._forward_impl(x)


### 构建large基础mobilenet_v3_large模型
def mobilenet_v3_large(num_classes: int = 1000,
                       reduced_tail: bool = False) -> MobileNetV3:
    """
    Constructs a large MobileNetV3 architecture from
    "Searching for MobileNetV3" <https://arxiv.org/abs/1905.02244>.

    weights_link:
    https://download.pytorch.org/models/mobilenet_v3_large-8738ca79.pth

    Args:
        num_classes (int): number of classes
        reduced_tail (bool): If True, reduces the channel counts of all feature layers
            between C4 and C5 by 2. It is used to reduce the channel redundancy in the
            backbone for Detection and Segmentation.
    """
    width_multi = 1.0
    bneck_conf = partial(InvertedResidualConfig, width_multi=width_multi)
    adjust_channels = partial(InvertedResidualConfig.adjust_channels, width_multi=width_multi)

    reduce_divider = 2 if reduced_tail else 1   # 是否较少网络参数标志,默认是False,即不减少

    # # beneckBlock结构一系列参数列表
    inverted_residual_setting = [
        # input_c, kernel, expanded_c, out_c, use_se, activation, stride
        bneck_conf(16, 3, 16, 16, False, "RE", 1),
        bneck_conf(16, 3, 64, 24, False, "RE", 2),  # C1
        bneck_conf(24, 3, 72, 24, False, "RE", 1),
        bneck_conf(24, 5, 72, 40, True, "RE", 2),  # C2
        bneck_conf(40, 5, 120, 40, True, "RE", 1),
        bneck_conf(40, 5, 120, 40, True, "RE", 1),
        bneck_conf(40, 3, 240, 80, False, "HS", 2),  # C3
        bneck_conf(80, 3, 200, 80, False, "HS", 1),
        bneck_conf(80, 3, 184, 80, False, "HS", 1),
        bneck_conf(80, 3, 184, 80, False, "HS", 1),
        bneck_conf(80, 3, 480, 112, True, "HS", 1),
        bneck_conf(112, 3, 672, 112, True, "HS", 1),
        bneck_conf(112, 5, 672, 160 // reduce_divider, True, "HS", 2),  # C4
        bneck_conf(160 // reduce_divider, 5, 960 // reduce_divider, 160 // reduce_divider, True, "HS", 1),
        bneck_conf(160 // reduce_divider, 5, 960 // reduce_divider, 160 // reduce_divider, True, "HS", 1),
    ]
    last_channel = adjust_channels(1280 // reduce_divider)  # C5

    return MobileNetV3(inverted_residual_setting=inverted_residual_setting,
                       last_channel=last_channel,
                       num_classes=num_classes)

### 构建small基础mobilenet_v3_small模型
def mobilenet_v3_small(num_classes: int = 1000,
                       reduced_tail: bool = False) -> MobileNetV3:
    """
    Constructs a large MobileNetV3 architecture from
    "Searching for MobileNetV3" <https://arxiv.org/abs/1905.02244>.

    weights_link:
    https://download.pytorch.org/models/mobilenet_v3_small-047dcff4.pth

    Args:
        num_classes (int): number of classes
        reduced_tail (bool): If True, reduces the channel counts of all feature layers
            between C4 and C5 by 2. It is used to reduce the channel redundancy in the
            backbone for Detection and Segmentation.
    """
    width_multi = 1.0
    bneck_conf = partial(InvertedResidualConfig, width_multi=width_multi)
    adjust_channels = partial(InvertedResidualConfig.adjust_channels, width_multi=width_multi)

    reduce_divider = 2 if reduced_tail else 1

    inverted_residual_setting = [
        # input_c, kernel, expanded_c, out_c, use_se, activation, stride
        bneck_conf(16, 3, 16, 16, True, "RE", 2),  # C1
        bneck_conf(16, 3, 72, 24, False, "RE", 2),  # C2
        bneck_conf(24, 3, 88, 24, False, "RE", 1),
        bneck_conf(24, 5, 96, 40, True, "HS", 2),  # C3
        bneck_conf(40, 5, 240, 40, True, "HS", 1),
        bneck_conf(40, 5, 240, 40, True, "HS", 1),
        bneck_conf(40, 5, 120, 48, True, "HS", 1),
        bneck_conf(48, 5, 144, 48, True, "HS", 1),
        bneck_conf(48, 5, 288, 96 // reduce_divider, True, "HS", 2),  # C4
        bneck_conf(96 // reduce_divider, 5, 576 // reduce_divider, 96 // reduce_divider, True, "HS", 1),
        bneck_conf(96 // reduce_divider, 5, 576 // reduce_divider, 96 // reduce_divider, True, "HS", 1)
    ]
    last_channel = adjust_channels(1024 // reduce_divider)  # C5

    return MobileNetV3(inverted_residual_setting=inverted_residual_setting,
                       last_channel=last_channel,
                       num_classes=num_classes)
pytorch代码复现MobileNet V1~V2
本项目包含训练MobileNet V1、V2、V2模型
项目目录

项目代码下载地址:
项目代码下载地址
智能推荐
攻防世界_难度8_happy_puzzle_攻防世界困难模式攻略图文-程序员宅基地
文章浏览阅读645次。这个肯定是末尾的IDAT了,因为IDAT必须要满了才会开始一下个IDAT,这个明显就是末尾的IDAT了。,对应下面的create_head()代码。,对应下面的create_tail()代码。不要考虑爆破,我已经试了一下,太多情况了。题目来源:UNCTF。_攻防世界困难模式攻略图文
达梦数据库的导出(备份)、导入_达梦数据库导入导出-程序员宅基地
文章浏览阅读2.9k次,点赞3次,收藏10次。偶尔会用到,记录、分享。1. 数据库导出1.1 切换到dmdba用户su - dmdba1.2 进入达梦数据库安装路径的bin目录,执行导库操作 导出语句:./dexp cwy_init/[email protected]:5236 file=cwy_init.dmp log=cwy_init_exp.log 注释: cwy_init/init_123..._达梦数据库导入导出
js引入kindeditor富文本编辑器的使用_kindeditor.js-程序员宅基地
文章浏览阅读1.9k次。1. 在官网上下载KindEditor文件,可以删掉不需要要到的jsp,asp,asp.net和php文件夹。接着把文件夹放到项目文件目录下。2. 修改html文件,在页面引入js文件:<script type="text/javascript" src="./kindeditor/kindeditor-all.js"></script><script type="text/javascript" src="./kindeditor/lang/zh-CN.js"_kindeditor.js
STM32学习过程记录11——基于STM32G431CBU6硬件SPI+DMA的高效WS2812B控制方法-程序员宅基地
文章浏览阅读2.3k次,点赞6次,收藏14次。SPI的详情简介不必赘述。假设我们通过SPI发送0xAA,我们的数据线就会变为10101010,通过修改不同的内容,即可修改SPI中0和1的持续时间。比如0xF0即为前半周期为高电平,后半周期为低电平的状态。在SPI的通信模式中,CPHA配置会影响该实验,下图展示了不同采样位置的SPI时序图[1]。CPOL = 0,CPHA = 1:CLK空闲状态 = 低电平,数据在下降沿采样,并在上升沿移出CPOL = 0,CPHA = 0:CLK空闲状态 = 低电平,数据在上升沿采样,并在下降沿移出。_stm32g431cbu6
计算机网络-数据链路层_接收方收到链路层数据后,使用crc检验后,余数为0,说明链路层的传输时可靠传输-程序员宅基地
文章浏览阅读1.2k次,点赞2次,收藏8次。数据链路层习题自测问题1.数据链路(即逻辑链路)与链路(即物理链路)有何区别?“电路接通了”与”数据链路接通了”的区别何在?2.数据链路层中的链路控制包括哪些功能?试讨论数据链路层做成可靠的链路层有哪些优点和缺点。3.网络适配器的作用是什么?网络适配器工作在哪一层?4.数据链路层的三个基本问题(帧定界、透明传输和差错检测)为什么都必须加以解决?5.如果在数据链路层不进行帧定界,会发生什么问题?6.PPP协议的主要特点是什么?为什么PPP不使用帧的编号?PPP适用于什么情况?为什么PPP协议不_接收方收到链路层数据后,使用crc检验后,余数为0,说明链路层的传输时可靠传输
软件测试工程师移民加拿大_无证移民,未受过软件工程师的教育(第1部分)-程序员宅基地
文章浏览阅读587次。软件测试工程师移民加拿大 无证移民,未受过软件工程师的教育(第1部分) (Undocumented Immigrant With No Education to Software Engineer(Part 1))Before I start, I want you to please bear with me on the way I write, I have very little gen...
随便推点
Thinkpad X250 secure boot failed 启动失败问题解决_安装完系统提示secureboot failure-程序员宅基地
文章浏览阅读304次。Thinkpad X250笔记本电脑,装的是FreeBSD,进入BIOS修改虚拟化配置(其后可能是误设置了安全开机),保存退出后系统无法启动,显示:secure boot failed ,把自己惊出一身冷汗,因为这台笔记本刚好还没开始做备份.....根据错误提示,到bios里面去找相关配置,在Security里面找到了Secure Boot选项,发现果然被设置为Enabled,将其修改为Disabled ,再开机,终于正常启动了。_安装完系统提示secureboot failure
C++如何做字符串分割(5种方法)_c++ 字符串分割-程序员宅基地
文章浏览阅读10w+次,点赞93次,收藏352次。1、用strtok函数进行字符串分割原型: char *strtok(char *str, const char *delim);功能:分解字符串为一组字符串。参数说明:str为要分解的字符串,delim为分隔符字符串。返回值:从str开头开始的一个个被分割的串。当没有被分割的串时则返回NULL。其它:strtok函数线程不安全,可以使用strtok_r替代。示例://借助strtok实现split#include <string.h>#include <stdio.h&_c++ 字符串分割
2013第四届蓝桥杯 C/C++本科A组 真题答案解析_2013年第四届c a组蓝桥杯省赛真题解答-程序员宅基地
文章浏览阅读2.3k次。1 .高斯日记 大数学家高斯有个好习惯:无论如何都要记日记。他的日记有个与众不同的地方,他从不注明年月日,而是用一个整数代替,比如:4210后来人们知道,那个整数就是日期,它表示那一天是高斯出生后的第几天。这或许也是个好习惯,它时时刻刻提醒着主人:日子又过去一天,还有多少时光可以用于浪费呢?高斯出生于:1777年4月30日。在高斯发现的一个重要定理的日记_2013年第四届c a组蓝桥杯省赛真题解答
基于供需算法优化的核极限学习机(KELM)分类算法-程序员宅基地
文章浏览阅读851次,点赞17次,收藏22次。摘要:本文利用供需算法对核极限学习机(KELM)进行优化,并用于分类。
metasploitable2渗透测试_metasploitable2怎么进入-程序员宅基地
文章浏览阅读1.1k次。一、系统弱密码登录1、在kali上执行命令行telnet 192.168.26.1292、Login和password都输入msfadmin3、登录成功,进入系统4、测试如下:二、MySQL弱密码登录:1、在kali上执行mysql –h 192.168.26.129 –u root2、登录成功,进入MySQL系统3、测试效果:三、PostgreSQL弱密码登录1、在Kali上执行psql -h 192.168.26.129 –U post..._metasploitable2怎么进入
Python学习之路:从入门到精通的指南_python人工智能开发从入门到精通pdf-程序员宅基地
文章浏览阅读257次。本文将为初学者提供Python学习的详细指南,从Python的历史、基础语法和数据类型到面向对象编程、模块和库的使用。通过本文,您将能够掌握Python编程的核心概念,为今后的编程学习和实践打下坚实基础。_python人工智能开发从入门到精通pdf